Happy Friday! I'm ready for the weekend! Hope you have a fun one planned. :)

While on Pinterest this week I found a new tool they've added that I thought was pretty cool. I think it's been around for at least a few weeks now but as always I'm late to the party.

It's brilliant so I had to share. When you open a photo in Pinterest you'll see a little square in the upper right hand corner:
Search tips on Pinterest

Click on that and a ton of other photos that are similar to the one you you're looking at will pop up on the right:  
Searching tool on Pinterest

You can expand the cropping so that it "reads" the whole photo: 
Pinterest tip to find similar photos

This gives you even more (and I think better) comparative photos. This is awesome!! Be sure to use the scrolling tool on the right to see all of the photos they suggest. 

What's even better is there are descriptive words and phrases across the top -- click on those for more specific examples that match those phrases. It will still use your inspiration photo to find those. 

I do find it works best when it's a full shot of a room or vignette. Pins with only words don't translate and it doesn't always recognize close up photos well. But for wider shots this is such a great option!

When I'm looking at ideas I tend to look at Pinterest first and search there -- are you like that? Google has become my second source. This is so helpful when you find a specific decorating idea you love. 

Loved this and thought I would share! Hope you have a wonderful and safe weekend. :) 


Alright my friends -- this is my favorite post of the year so be warned…there are a ton of photos. Twelve years ago tomorrow we closed on our home and I know I say it every year, but I cannot believe I've had the privilege of living in a home I love this much for so long. We moved a lot when I was young and times got pretty rough. It is truly a dream come true to have this house and to be settled for so long. 

Before and after photos are my favorite ever so I just love this kind of post. It makes me giddy. I did the same thing last year (check that post out for different views and to see how these spaces have changed since!) -- I love to see how our house changes over the years. Every year I "finish" a room and slow but sure our house has become exactly what we want and love. 

Let's start the tour, shall we? Our living room has always stumped me because of super high ceilings. I used to decorate up and quickly decided it didn't work: 

Don't you love the pink walls? Yeah I picked that out myself. It was a taupe color but honest to goodness PINK when I look back at it. I always went with brown and red to work with it because nothing else would: 

Obviously my photography skills have improved over the years but so has the room: 
Slipcovered sofa neutral

Funny how placing that sofa there and pulling it away from the wall makes the space feel bigger, right?  

Here's another view of this space: 
Spool chair

This view was from later but really shows off those pink walls! Oh yeah!: 

If you look to the right where the chair is, that's the area where I built a bookcase on that half wall: 
DIY half wall bookcase

I've said it before and I'll say it again, I'm not one to knock my old style. (OK, I'm totally knocking the pink walls.) Our home has always been warm and comfy to us. Even though my style has changed over the years I'm no less proud of what I did along the way. :)

A few years after we moved in we had laminate floors put down and it made a huge difference in our family room and kitchen. But it made it much darker then before: 

Here's that same view now:  
Extending kitchen island DIY

I'm SO glad we paid extra to bump out that little bay window area. We barely had enough room around the table even with that there. As you can see most of our furniture was hand-me-downs for quite some time: 

Here's the same window area now: 
Window seat in kitchen

Black interior doors

I finished up the kitchen last year and it is truly a dream space for me. I absolutely love it. 

Here's a view through the family room and kitchen: 

Here's that same part of the kitchen now:
Two toned kitchen gray and white

That dishwasher is still kickin'! It hardly washes the dishes and we've repaired it a good seven times, but it's working. :) 

Building cabinets to ceiling

One day I thought it would be a great idea to paint my office/playroom an orange color -- and not just the walls but the ceiling too. I am throwing some shade at myself of that decision. Ha! I was going for a brick red and it went wrong: 

That corner is now one of my favorite spots in the house and is where I sit and write to you all: 
Corner with windows

As you can see, I am a little obsessed with trim on the walls: 
Board and batten wall treatment

It certainly has brightened up our house! I don't think I could ever go all white -- I love having the contrast of some color with the white trim.

That orange office is now gone because that area is open to our family room. Years ago we took down this wall:

And now the family room is almost double the size: 
Dark gray fireplace with built ins

One of my all time favorite transformations was our dining room: 

Pink! :) 

Whats' better than pink? Dark chocolate brown...everywhere!: 
chocolate brown dining room
Gosh I LOVED this room all dramatic like this. It made a statement for sure. I think dining rooms can handle some drama.

But we never used that room…ever. I got a crazy idea one day and decided to change it into a library/lounging space I knew we'd actually use. The bookcases were my first project:
DIY wall of bookcases
It only took me about five years to finish it but it's done and I am so happy we don't have a dining room anymore.  :) (Although it could easily turn into one again!)

Our basement was unfinished up till a few years ago. We still used it though: 

That same area looks like this now: 
Toy storage built in cubbies

Check below for a link to the rest of this space. We love it!

My stepdaughter picked out all of the colors for her tween/early teen room all those years ago and she and her friends helped me paint it. That evening was a great memory: 

I'm almost finished with this redo and couldn't' be happier with this fresh, bright room now: 
Farmhouse look for bedroom
Our master bedroom has had a few looks over the years. I started the painting forever ago with just the fireplace wall: 

Here's that same area now (I eventually finished up that dark green and it stayed for more than ten years):
Fireplace in bedroom


Light gray walls bedroom

 Another big wall on that room always stumped me:

And I recently finished up that mammoth wall and added some art: 
Whitestone Benjamin Moore

Our master bath hasn't seen any updates at all over the years but I just finished up a quick redo in my son's bathroom. I painted it before he was born and it stayed "baby" till he turned nine: 

I was a little busy with other projects. ;) 

All I did was paint the walls and change out some accessories. It's one of my favorite projects ever because those simple changes made such a big difference: 
Simple bathroom updates

Another one of my favorite projects is our powder room. This little space saw a lot of changes over the years too. The first look was a two toned one: 

Now it's white and bright with fun pops of color that I love: 
Planked walls bathroom

The planked walls are so fresh and pretty! I love this room.

Whew! There you go -- a mini tour of the house and I didn't even have to clean! ;) 

I share these because I'm proud of them, but even more so because I think it's important to remind you that it has taken me a loooong time to figure out exactly what I want our home to look like. I've had some hiccups along the way for sure. Over the past few years I feel like I finally feel like I've identified what I love and want for our spaces. 

There's still so much I want to do to this house! It still excites me to dream up ideas and plan them out. Someday I'll be close to done…but that day won't be for a few more years. I'll always tweak and find ways to make our spaces work best for us. It is my passion and I'm so thankful I can share that with you! :) 

Here's links to posts on all the rooms I included here! 

You can find all of our paint colors here. If you have questions about anything in these photos, let me know! 


So a couple weeks ago a reader on Instagram commented that I don't have any "close the door" rooms.  It made me laugh out loud -- I know those rooms too well. We've had them in the past but over the last few years they have dwindled. It's taken a long time to get to that point (we'll be in the house 12 years this week!) but there is still ONE room. 

We don't speak of this room. Only one man dares to enter and that's my husband. OK, I go in to grab clothes because that's where our laundry chute is. But that's it! It's always been a very scary place, especially for me because it was a MESS. 

This pit of despair is my husband's office in the basement. He can function in disorganized spaces (he's a creative type -- he plays, writes and teaches music) but the longer I'm on this Earth the less I can handle it. We were just talking the other day how we're both "right brained" but I need much more order than he does. 

My husband was a band director for 30 years and he recently retired from teaching. He's actually busier now than he was then, which is why the boxes and piles and items that filled his school office for those 30 years have been an unorganized mess in his basement office since he retired. He simply hasn't had the time to dedicate to going through everything. It makes me twitch a little, but I simply close the door

Well, a water leak a few weeks ago was a blessing in disguise. We were away for spring break for a few days and the day we got home I heard water running in our utility closet. I knew the sound well -- it has happened for 10 years now. Our humidifier in our HVAC system gets filled with lime and then the connections come apart and the water just sprays out…and then leaks to the basement. 

The damage was so much worse than usual because it had been going for days. Our new heating and cooling company replaced the old system and then installed a drip pan directly underneath -- we're praying this eliminates the water issues we've had over the years. Finally a company came up with a plan to help prevent it from happening again!

Because my husband's office is under this spot, it's had the brunt of the water for years now. It wasn't as big of a big deal before we finished the basement. It's happened since we finished it but since we usually catch it so fast we just put industrial dryers in there and it's done. This time we weren't so lucky. 

Bottom line -- we decided it was time to rip the carpet out of that room (it was soaked and the padding was a mess) and replace it. I've been researching the best options and found this stuff: 
Vinyl flooring that looks like wood, water resistant

It's vinyl flooring from Allure and it is water resistant. We had carpet installed throughout the basement years ago when we finished it and I quickly realized it was not the best idea. It's our kid zone (and also big family space) and the kids spill stuff all the time. Also, our animals have destroyed parts of it. Our old cat found a spot and if you know how that goes if you have kitties. 

It's just kind of gross already and as comfy as it is, we know the carpet needs to go. This stuff will go throughout the whole basement eventually, but for now we focused on this room. They have a ton of color options, but only four in the store that you can purchase. (I got ours from Home Depot.)

I prefer a slightly darker floor but when we go this home and saw it down there I knew this was a great pick -- it's not too dark and it's really a beautiful color. It truly looks like wood: 
Allure wood plank flooring

It has a some slight texture to it that I love too: 
Wood flooring for basements

We had to pick it out quickly and get moving because the contractors we use had offered to do it one day last week when they didn't have work. They offered us a crazy good deal. They had already taken out the drywall (where the water had leaked) and replaced that for us, so they threw this flooring in for a little more. I've never laid this stuff (I did install similar vinyl tiles in our mud room as a temporary fix years ago) so I wanted to have them do it so I could watch and see how it was done. 

It's a floating floor and there are sticky sections on the sides and underneath each board (see above -- the gray parts). You lay them down (it's a floating floor) and the sticky parts go together. The guys ran out of flooring (more on that in a bit) so I had to run and get another box and wanted to finish it myself: 
Wood lookalike for basements

I laid a few and thought, this will be quick! It was SO easy. You know how saying that always bites me in the butt though. It was easy to install -- ridiculously easy. But there was a little strip at the end that the quarter round wasn't going to cover, so I had to cut thin pieces to fill it: 
Vinyl flooring that looks like wood

I didn't have a good way to score such long pieces to fit in there so I sat and looked around at all of the scrap and got an idea. I used my favorite scissors (these are AWESOME and I use them all the time) and just cut strips from the sticky part: 
Installing vinyl flooring

There's a sticky part that faces up (the gray) and a sticky strip that faces down with the wood look on top. That's what I cut to make this work. 

I cannot tell you how thrilled we are with this room and the flooring!! It looks SO GOOD: 
Allure flooring review

It's so warm and clean and I just love it. I can't believe how much bigger the room looks now. Part of that is that we took all of the piles out too -- I have sorted and filled 14 boxes so far. They aren't huge boxes, but still…14 people. And I'm going to get two more today. When my husband's schedule dies down here soon we will sort through it all. For now my next project is to paint the walls and get the room set up again.

I was sure this room was around 9 by 9, maybe 10 by 10 at the most. It's not a big room -- at least I thought. When we actually measured we realized it's nearly 12 by 12 -- that shows you how much stuff was in here! I really should have taken a before picture but then I'm sure you'd never talk to me again. ;) 

It's going to be such a great, organized space for my husband when we're done with it. We're both so excited to be able to leave the door open to this room now. Ha!: 
Allure vinyl flooring
Here's some quick things to consider if you are looking into this floor: 

1. It is VERY easy to install -- there is no underlayment needed and very little tools (you score it and snap it or use a saw but it will wear down your blade quick). 
2. It is a floating floor and it does have that laminate sound when you walk on it (the hollow sound). Not a big deal to me as we don't even wear shoes in the house much and really, this is the best option for a basement that has possible water issues. 
3. The price was around $40 for a box and it covers 25 square feet. 
4. My only complaint is there is some waste that can't be used -- you have to place the sticky parts together in such a way that when you get to the end and have to cut a piece, you'll have a decent amount left that looks like it's usable, but it's not. You cut off the end with the sticky part to use and the rest won't work. So you will need more than the square footage of your room. 
5. When I read up on this Allure stuff a couple years ago (soon after we realized the carpet wasn't going to work) many of the reviews complained of a heavy plastic odor from it. I have haven't noticed anything like that. You'd think it would be even worse in a basement with no windows but I don't smell it at all. 
6. My main concern was that it would be cold underfoot, like tile is over concrete. It's obviously not as warm as the carpet but I'm pleasantly surprised with it. It's not freezing cold by any means. 
7. As with any flooring, it does need to acclimate in the space where you are installing it for at least 24 hours before you put it in.

I hope this helps if you are considering something similar! Because it's water resistant this is also a great option for bathrooms (and would be warmer than tile). I plan to do the rest of the basement myself -- that's the plan now anyway. It's going to take me awhile but it's so easy to do, I kind of hate to pay for it. Have you installed this flooring? If you have any questions, please let me know!

Affiliate link included for your convenience! 

Hey there all! Hope you have had a great week and have an even better weekend planned! I'm back today to share a popular post from years ago with a little updated info. 

This is a perfect example of buying vs. doing it yourself. I LOVE to DIY but there are definitely times I just want to buy an item. Believe me, I say do what you want (Cartman!) -- if it makes you happy to do it yourself, go for it. If you have the money and have no desire to DIY, buy the sucker. 

I will say doing it yourself is usually cheaper. This is a good example. I was at Home Depot this week picking up flooring for the basement (more on that soon) and came across this fun new section: 
Wood crates and pallets Home Depot

I had to laugh because they are selling pallets now! I actually think this is quite brilliant. None of them are full sized pallets, just half, but still, it's a smart move on their part. It just made me laugh because you can get them for free some places. (Please check with a business before taking pallets though -- some will gladly pass them on, others will not.) 

They had a bunch of other containers and ideas as well -- I love the cute photos they had above with ideas. My mouth did fall open when I saw the price of this one though: 
Long wood box Home Depot

And that's when I got to thinking about this old post. My DIY wood trough is one I get asked about a ton and it's really one of the simplest projects I've ever done. I used a nail gun but you could use clamps and glue or a hammer and nails do to it as well. Have the folks cut your wood if you don't have a saw. 

I have two of these now and the possibilities with them are endless. I love filling them with greenery and lights at Christmas! They look great on a window sill or down the middle of a table -- they're great for filling odd spots. 

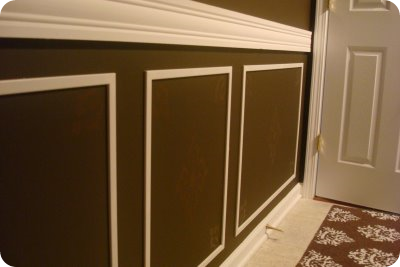
Last year I placed one on the bookcase I built in our living room: 
DIY half wall bookcase

It still has dried hydrangeas in it and looks so pretty. :) My first box was free because I used scrap wood. I used cedar for that one but the other is just made with basic pine. Both stain beautifully:
gray fireplace marble tile

If you want to build a smaller one like at Home Depot it will probably run you less than $6, if that. The beauty of it is, if you don't want to do it yourself, just buy it! Remember you'll still need to paint or stain it but I think it's great that they are carrying these items now.

Here's the original tutorial for you! This is my post from years ago so if there are old references that's why. And my boy was just a baby back then! Sniff. Enjoy…


Today I wanted to share another how-to for a project from the family room redo. I’m almost done, I swear. :) When we moved the TV over the long dresser, it meant my accessory options dwindled quite a bit. Whatever I put on there had to be long and low…and I didn’t have anything that would work.
I lived with it for a few days and then an idea came to me. I love the look of the old wood troughs I’ve seen here and there online and in antique shops. I guess they’re called troughs – I have no idea.
I just love them. :)

I knew I could make my own, so that I did. I wanted it to be longer than the TV, so I needed something 48 inches long. I went out the garage and found a scrap of thick molding used as a chair rail in our powder room:

That room has been torn apart for months now. That is how I roll.

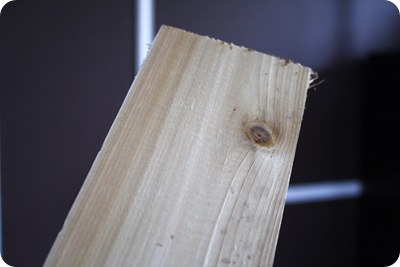
I used that as the base, or bottom of the container, because I knew it wouldn’t be seen. For the sides, I wanted a rustic, dark wood. So I dug around the garage some more. And I found some leftover cedar from our shutter fix out front. This is why I’m OK with the fact that we can’t walk through half of our garage. I keep all my scraps for just this. :)

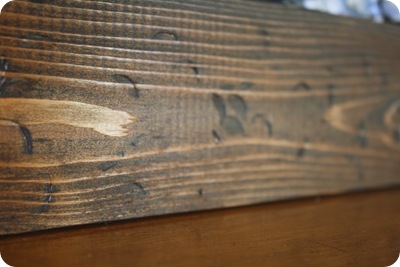
The cedar has a rough side:
cedar wood
But that was a little too rough for me, so I went with the smooth side:

But it needed a little distressing. :)

I grabbed some tools:

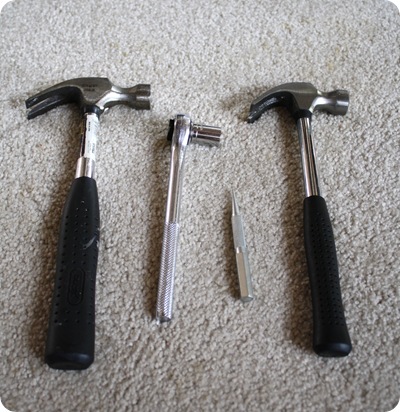
And my assistant got to work:
my assistant
For once Mommy said take the hammer and GO FOR IT.
We had a blast. :)

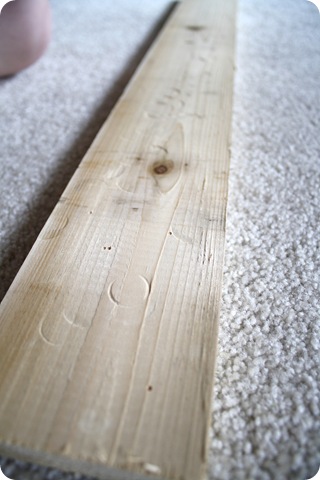
Afterwards this is what we had:
Making a decorative wood box

And after using a foam brush to apply a quick coat of this:
minwax dark walnut
(I tell you what – stain lasts forever. I’ve had this little can for YEARS.)

We ended up with a beautiful, rustic piece of wood:

I put it together like I did the DIY window boxes I showed you here. Basically I glued and nailed the sides onto the sides of the bottom piece of wood, then capped each end off like so:
Decorative wood box
The rough end of the wood shows at each end, but that’s what I wanted. LOVE. By the way, this is so not perfect. There’s some gaps at the ends where wood meets wood -- I just put the not-perfect side on the back. :)

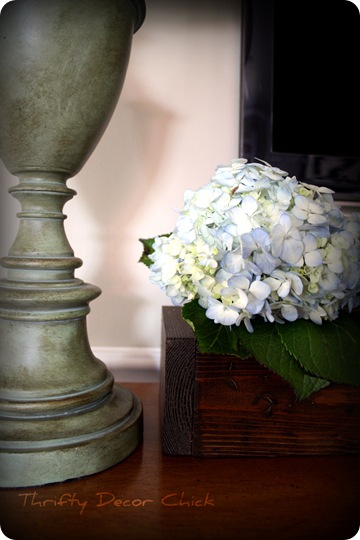
I envisioned big puffy hydrangeas spilling out of it when I made this thing, and they sure don’t disappoint:
trough of hydrangeas
It’s deep enough so I could just put little cups of water in there, then place the flowers in. :)
I LOVE IT!:

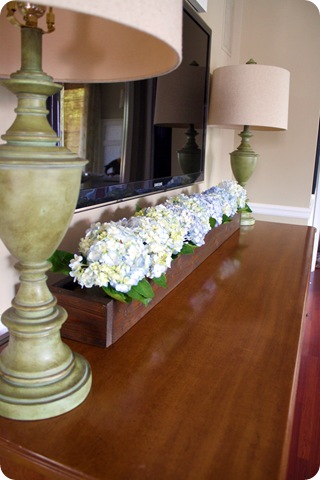
I’m quite giddy about it’s possibilities too – piled high with acorns and leaves for fall, greenery and ornaments at Christmas, grass and Easter eggs…I could go on and on! It’s the project that keeps on giving. :)

I love how it turned out, and I promise you can do one of these too. This one took about 40 minutes start to finish, but I used a compound saw and a nail gun, which definitely speeds up the process.
It could be done without either though – a hand saw and regular nails would work just fine (the nails would add to the rustic look!).

One more look at my DIY trough-thingamabob:
DIY wood trough
I love how well it fills in that awkward spot! If you decide to try it, I think the cedar was about $4 for an eight foot piece. You could use just about any kind of wood though – you’ll get the same effect with some distressing and stain.


This is such a simple and inexpensive project, I just had to bring it back out from the depths! :) Have a wonderful weekend my friends!

Popular Posts