Hey there! I'm posting late today because we voted early this morning -- I couldn't even believe the lines! We waited 45 minutes and that was the shortest wait in our county. I'll be SO HAPPY when this election is over, but no matter the outcome I'm excited to see so many people passionate enough to get out and vote this year. It's going to be interesting next week!

So we've had some progress in the basement and yet again it's not done...but I like to show you the steps along the way. Things usually move at a snail's pace around here so if I didn't share the steps this blog would be crickets. :)

As a reminder, we started with a simple wall of cabinets years ago:
DIY basement kitchenette

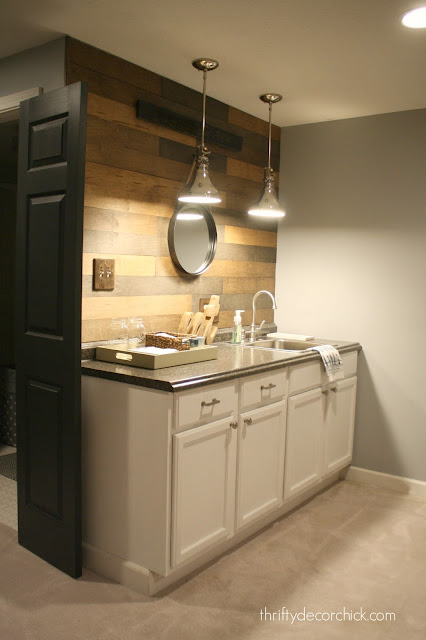
Later on I added a wood wall (love!): 
basement kitchenette with wood wall

And then our old cat starting getting...well, old. And we pretty much stopped using that area in front of the sink because he ruined the carpet there. We didn't use the sink much at all for some time and eventually pulled the carpet out in just that spot.

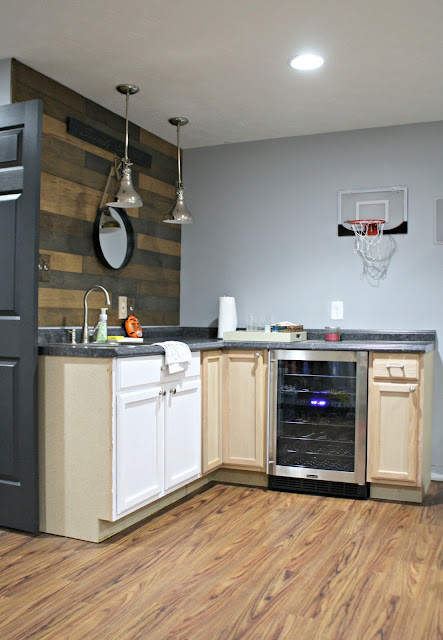
So when we got the new floors down here we were psyched about being able to use this space again! Here's how it looked after those went in (the cabinets were not installed): 
planked wood wall above cabinets

We had a plan to add to the cabinets and it was actually our son who came up with it. :) He and I like to walk through model homes and after one visit to a cool basement he was excited about possibly extending our cabinets along the other wall. My boy is taking after me! 

He gave up his basketball "court" in order to do this which makes me all sniffly. ;) We're moving his indoor hoop but it's still hanging in it's old spot in these pics. 

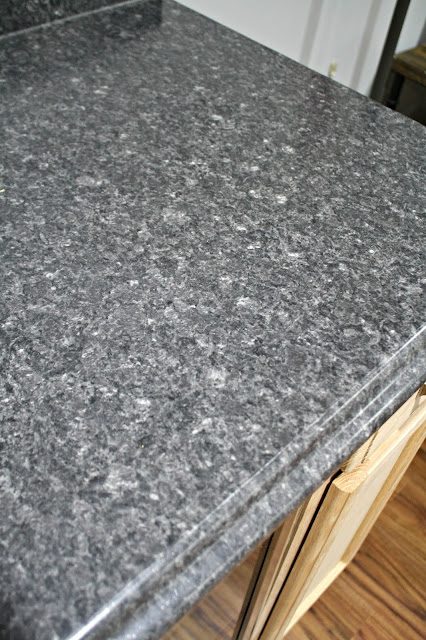
The laminate is the same one we used before -- it's a dark gray/black that looks like granite -- similar to what we had in our kitchen for years and so many people thought it was real: 
dark laminate that looks like granite

I just couldn't bring myself to go with granite or solid surface down here. Maybe one day but laminate holds up so well and the price is hard to beat!

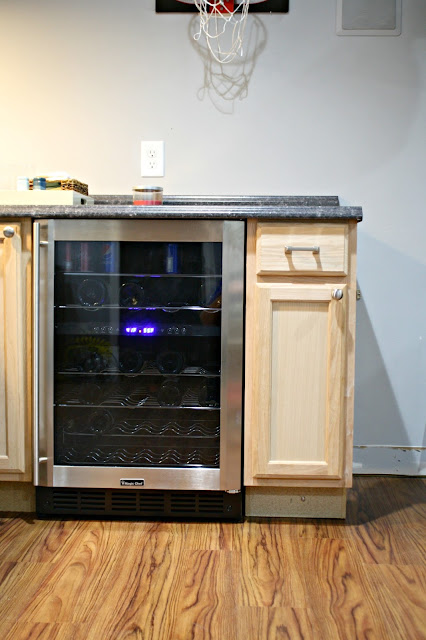
Years ago when we installed the cabinets our plan all along was to add a wine fridge down here...and we forgot about it. We must have been so excited to get the cabinets installed, we just totally spaced it on getting the fridge. We ended up getting a cheap dorm refrigerator instead (that we put in another room) but our dream was to have one of these: 
under cabinet wine fridge

Holy cats, it's awesome! This is from Home Depot and it has dual temperatures -- one area for soda, water and chilled wines and one for the rest of the wine. It's so stinking cool. This one holds a TON of wine too. Keep in mind it is made to be installed under a cabinet -- you need to look for something with a front vent if you are considering something similar. 

As you can see, we ended up taking the cabinets around to the side a little bit. I found the corner cabinet on clearance because it was all beat up. It was easily fixed so that was a huge deal! 

We were able to extend the plumbing over a bit so the sink is in a much better spot: 
basement sink in kitchenette

It's so nice to be able to use it again! It's the little things. :) 

We spend SO much time down here in the winter months and with all of the recent changes we've been down here even more. I've already washed many dishes in that sink! 

Here's a view of the whole area now: 
basement kitchenette progress

Keep in mind, this is very much in between. I have a lot to do -- install side panels on the cabinets, finish the baseboards on the wall and under the cabinets, paint the unfinished cabinets and then figure out what I'm going to do on the blank wall. 

I have some ideas in mind -- at first we thought we'd do wine holders, but that isn't necessary with the fridge. Years ago we had small shelves up on the planked wall and I did like that functionality. I'd like to get things off the counters (we'll just have the microwave there) and use the shelves for glasses and stuff we use often. I don't want upper cabinets, I know that. We don't need much additional storage. 

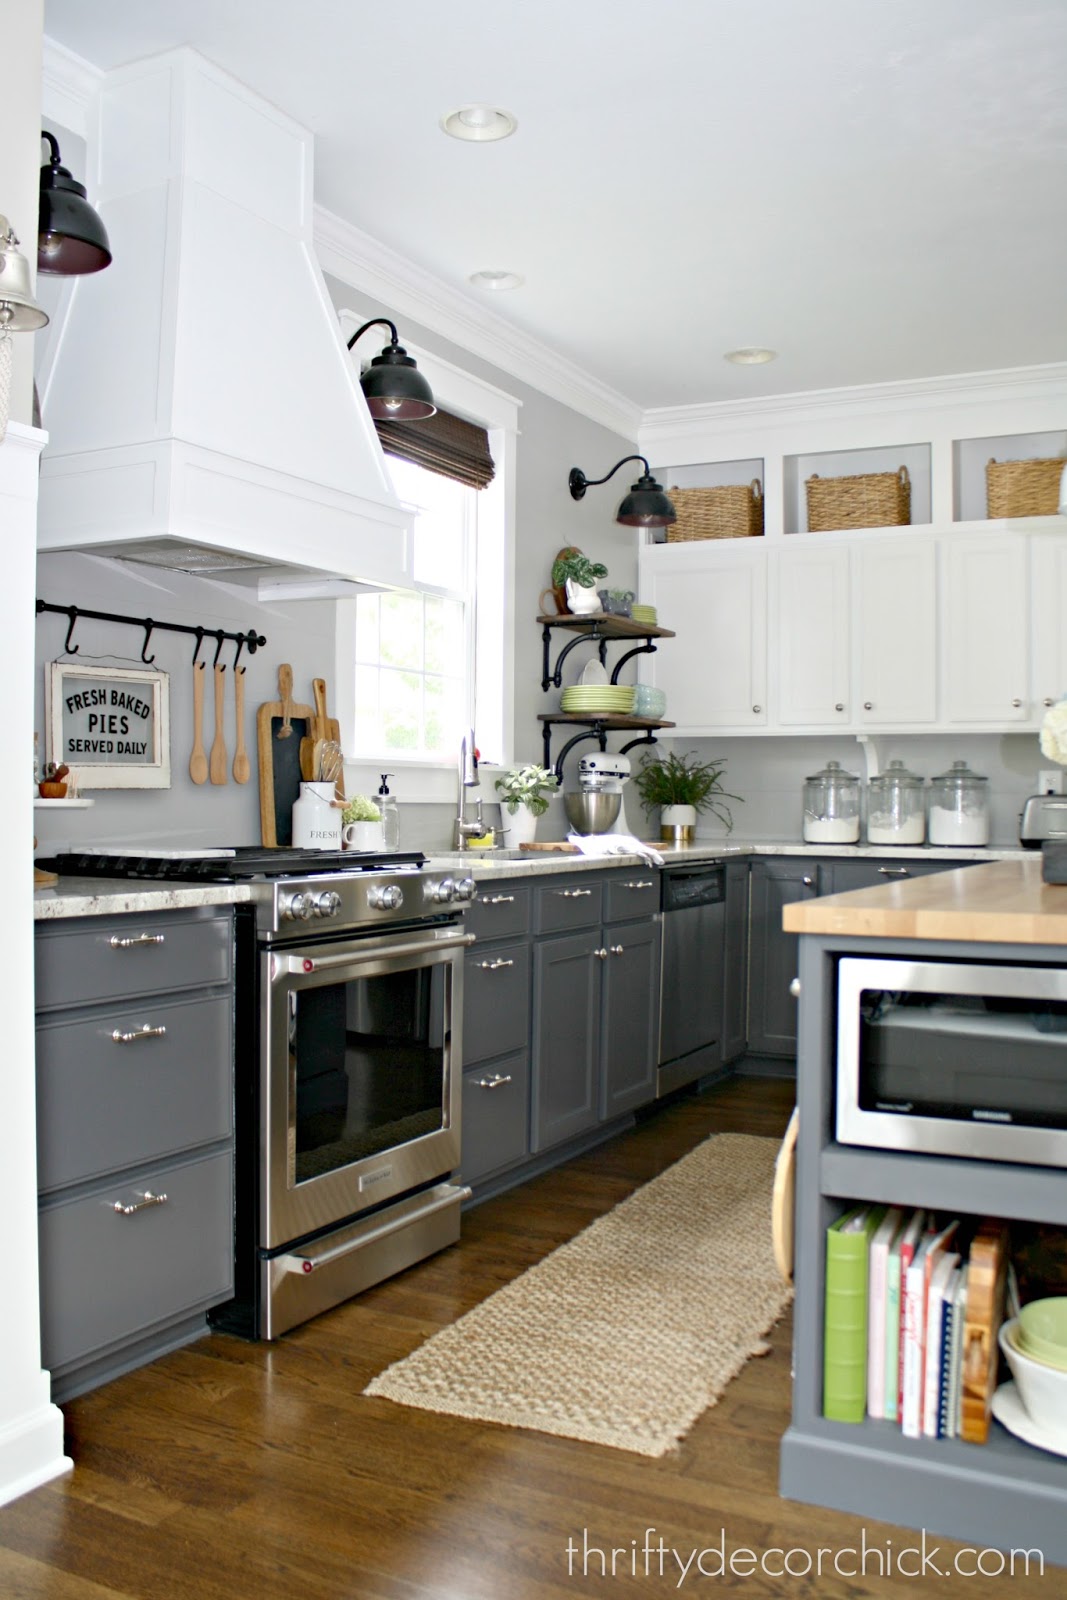
I don't want to extend the wood planks because that corner will get heavy feeling and I don't like to stop a wall treatment in the middle of a wall. I am drawn to the idea of a dark background though, like this one: 
kitchen bar with chalkboard and shelves

This one makes me all swoony -- that dark gray with the wood and the lights!: 
kitchenette with gray cabinets and shelves

Again, I don't think I'll do any wall treatment but here's an idea of shelves I like: 
basement kitchenette with planked walls and shelves

I like the idea of extending the warm wood tones to that empty wall with shelves without doing the full planking. 

This one is super cool too: 
basement kitchenette with wall storage

I think I've figured a way to make it look good and add some function as well. Stay tuned! I hope to have this done before Thanksgiving so we can enjoy it all winter. Of course I have the fireplace to finish too so it's a good thing I'm loving it so much down here lately because I'll be underground a lot. :) 

Do you have a similar space in your home? How did you make it function for your family? I LOVE basements so I'm so geeked out at making ours look even more cool and that we're adding some additional storage. 


So I've been at this blogging thing for nine and a half years now and it makes me SO happy when my readers take the time to email me a nice note or thank you. It really means the world to me. I especially love when some of you send me photos of projects in your home that I've inspired. It is a thrill to see so many of you making your home yours and I get giddy seeing your results.

I like to share some of these occasionally and today is one of those days. I'm blown away by your talent! Mary sent me photos of her kitchen -- she was inspired by ours and shared this before photo (I think our kitchen had that some wallpaper when I was a kid!):
kitchen reno before wallpaper

The after is so dramatic -- just gorgeous!: 
dark tile that looks like wood

Can you believe that floor is tile? I've seen this stuff before but never seen it look quite so real. That's amazing. Of course I love her light gray planked backsplash, pretty cabinets, beautiful vent hood and those lights...she knocked this room out of the park! 

I loved this area with the long breakfast bar as well, what a great idea: 
built in breakfast bar

I can't get over those floors! Thank you for sharing these Mary!

Holly in Washington shared this wall of built ins that ours inspired: 
wall of bookcases with desk

Her's was a family affair too -- her father and brother-in-law helped out. I LOVE that she incorporated a desk into this wall!

Kate was inspired by our built ins as well and look what they created!:
large wall of built ins with desk

Look at all that custom storage! Love! This one has two desks -- the combination of function and form always makes me happy. 

Michael in Arizona sent me photos of his awesome built in project too. They had this niche that so many newer homes have: 
what to do with large entertainment niche

Those are difficult to fill up sometimes, right? Well just look what he created in that area!: 
built ins in large niche

Doesn't it look like it was always supposed to be there? He did an amazing job on this, I'm so impressed. 

Stephen and Samantha had a long wall in their dining area that was a perfect spot for a wall of bookcases: 
dining room wall of built ins

See how well these work with a table? I always say we could easily add a dining table back into our library and it would look lovely. 

And last but not least, Stacey sent me the before of her living room:
living room before

And the gorgeous after!:
DIY wall of built ins

She hadn't had time to decorate them just yet when she sent the photo but goodness it is so warm and cozy even without accessories and books -- I love this room! 

Aren't these awesome? You all blow me away with what you create! I am so honored that I've inspired so many of you. It's a pretty amazing thing. If you've tackled a project that was inspired in part by something I've shared, I would LOVE to see it. Send me pics and I'll share them here sometime in the future. 

You can see my DIY kitchen renovation and all of the projects here
two toned kitchen renovation

And the DIY bookcases in our library (formerly the dining room) with links here
Thrifty Decor Chick DIY built ins 

Have a great weekend my friends! 


Well hello! Since I've been in the tile aisles lately (check out our basement fireplace project here), I've seen some AWESOME options that I had to share with you. Tile stores and showrooms are incredible, (and quite fun to look through if you haven't done it) but I have yet to purchase from them because the hardware stores have so many cool options at great prices. I've been incredibly pleased with the quality of them over the years too. 

I snapped some photos of my favorites from a couple stores to share with you (all on my phone so not my best photography). These first few are from Home Depot and I wish I had a spot for each one of them! This hexagon marble tile is gorgeous: 
hexagon marble tiles

I am going to use a pebble tile for our shower floor (someday...) and this is a favorite -- I love the gray tones:
mosaic pebble tiles

I bet this feels awesome underfoot too. ;) 

I love this for a more traditional look -- it's a classic:
black and marble tile

This small marble subway tile would be beautiful in a bathroom:
marble subway tile sheets

This basketweave has some darker tones and I bet it would be a stunner installed:
gray and white basketweave tile

I LOVED this version too -- it had more of a natural stone look:
natural basketweave tile

That one also had a lot of dimension to it that was really unique. 

This is a tiny, lighter version of the stacked stone we're using in the basement: 
small white stacked stone tile

These mosaic sheets of tile are so easy to install and this one above wouldn't need to be grouted -- always a bonus! 

THIS was a favorite and I must find a spot for it. This gray arabesque tile is gorgeous: 
gray arabesque tile

I'm sharing mostly mosaic sheets of tile but I loved this large marble subway tile too: 
large marble subway tile

So pretty! I love the large subway look!

This one was a ceramic made to look like marble: 
large ceramic marble lookalike tile

No worries about etching or staining on that!

These last options were from Lowe's -- I've always loved a penny tile and they have two options:
white penny tile

This stuff was so cool -- it's itty bitty subway tile! It would be a bear to grout but I thought it looked really neat: 
tiny subway tile mosaic

This was another ceramic tile made to look like marble -- the look without any of the fuss: 
ceramic marble subway tile

These were two more versions of the vintage black and white look:
vintage black and white tile

This hexagon version is larger than the HD option above and there are stone tiles mixed in with the marble: 
medium marble hexagon tile

As you can tell, I'm a sucker for the marble. I liked this oval tile too -- 
marble oval tile

That gives you a more modern look with a traditional material. 

This marble basketweave was pretty too:
marble basketweave tile

This one caught my eye -- each piece was huge and I loved the wavy look and the colors! This would be awesome in a bathroom!:
large wavy subway tile

This one is one of my favorites -- I can't get over how cute this bubble tile is and I'm trying to figure out where I can use it: 
bubble mosaic tile

Again, it would be such a pain to grout, but I'm guessing worth it! Most of these sheets are at $10 each and are about a square foot. 

Have you used any of these I have pictured? If so I'd love to see them -- feel free to link in the comments. I love that there are SO many cool options so easily accessible. These stores have really upped their game over the past few years. 

Here are a couple of my favorite tile projects in our house...

See how I installed the marble herringbone tile to our fireplace surround: 
gray fireplace with herringbone marble tile

And we used really inexpensive octagon tile sheets in our basement laundry and I love them: 
DIY laundry room shelves


Hey all, I hope you had a great weekend! I didn't mean to be away on Friday but we ended up heading out and spending a fun fall day exploring around our pretty state. Indiana in October is just stunning! 

I finished up a quick DIY over the weekend that I'm just tickled about. It turned out even better than I had hoped. I found this small, skinny table at our local Habitat Restore a week or so ago: 
bamboo table makeover

I've had a spot in mind for a bar cart in our dining room-turned-library for about a year now. I've almost bought one in various stores many times now, but none of them felt just right. Most were too industrial or way too fancy for what I wanted. 

I found one a couple weeks ago and loved it, but didn't know if it would work in the spot. I went home, measured, couldn't stop thinking about it and crossed my fingers that it would still be there a couple days later. Thankfully it was and I took it home for $15! 

I'm assuming there was a glass top on it at some point but I had a different idea in mind. The finish was that speckly faux wood look that I don't care for: 
bamboo table
The wood wasn't in great shape in some spots so between that and the finish I knew I was going to paint it. My go-to is usually black, gray or blue -- this area has plenty of blue and gray so I knew I wanted black. I thought it would look great but it looks SO great. :)

Before you spray paint anything you need to clean it really well. If you leave any residue on there at all the spray paint will not cover it:
prepping furniture for spray paint

It was filthy! I wiped down every little crevice. If you have stubborn sticky spots (not unusual on older furniture) you'll want to sand those down a bit and then wipe again. 

I'm taking advantage of every single spray paint day we have left this year! :) I took the table outside and started the process of spraying. I used this stuff just because we had it and I didn't want to go to the store: 
gloss spray paint and primer in one

It's great for metal but can be used on wood too. I was happy it was a primer and paint in one. Normally I would have sprayed some kind of primer on the table before the black. 

Later on I went to the hardware store and had a piece of wood cut down to fit the top and then picked up a wine glass rack from Pier 1. (This one is similar to mine.) I used some scrap wood underneath to build up the wood because it wasn't thick enough for screws to be installed from underneath: 
wine glass hanger

You can't see the scrap wood when you look at the table but I went ahead and sprayed that underside black as well just in case. 

I secured the top to the table with my nail gun and then hung a few of our wine glasses. Then I added some of our favorite barware that has been hidden away in cabinets:
repurposing an old table into a bar cart

We LOVE it! I'm sure I'll change things up a bit eventually but I'm so happy with it!: 
making a table into a bar cart

It's perfect in this spot -- we needed something there but I didn't want it to feel too heavy.

NOW I just have to keep the Nerf bullets away!:
bar cart makeover

Someday I'd love to find some wheels that fit over the legs -- I think that would finish it off perfectly!

I love the design. The bamboo look is a classic. :) I spent less than $30 to redo the table -- $15 for the table and about $12 for the wood: 
DIY bar cart makeover

It's been awhile since I've made over a thrift find -- we just don't need a lot of new furniture and I love pretty much everything we have. This one took some patience to find but it's just exactly what I wanted for this spot! 

Have you shopped the Habitat Restore Store? I love checking it out every few months -- you can usually find great pieces of furniture and they always have cool lighting. Our location even had some beautiful tile and flooring that would be perfect for a smaller space! 

Affiliate link included for your convenience! 

Check out some of my other spray paint projects below!

spray painting door knobs

spray painting outdoor light fixtures

spray painting brass lamps


Popular Posts