Tampilkan postingan dengan label Christmas. Tampilkan semua postingan
Hey all! Hope you're week has been wonderful! I've been incredibly lazy and it's been amazing. :) I've got a few more errands to run and a ton of wrapping to do over the next few days so it's time to get productive again. 

I have some super quick thrift store makeovers I wanted to share with you that I got at an awesome new store (for my local readers). 

The lovely folks at Mission 27 Resale in Indianapolis contacted me a few months ago and asked me to come out to visit their new location downtown. Mission 27 is run by the Society of St. Vincent de Paul, which is an organization that serves the poor and disadvantaged. I LOVE their mission for this store in particular. The lovely folks that run this organization noticed that the food that was being given out at their food bank wasn't always the healthiest of options (because of the cost). The proceeds from this store go to buying healthy foods for the food bank, among other things. 

ALL of the items in the store are donated and it is HUGE. I have to tell you I've never seen nicer items in a thrift shop! I can't wait to go back when I have more time to shop around. 

I grabbed a few treasures that I made over with spray paint for the holidays! They had a bunch of these stocking holders -- I got rid of ours last year because they were falling apart: 
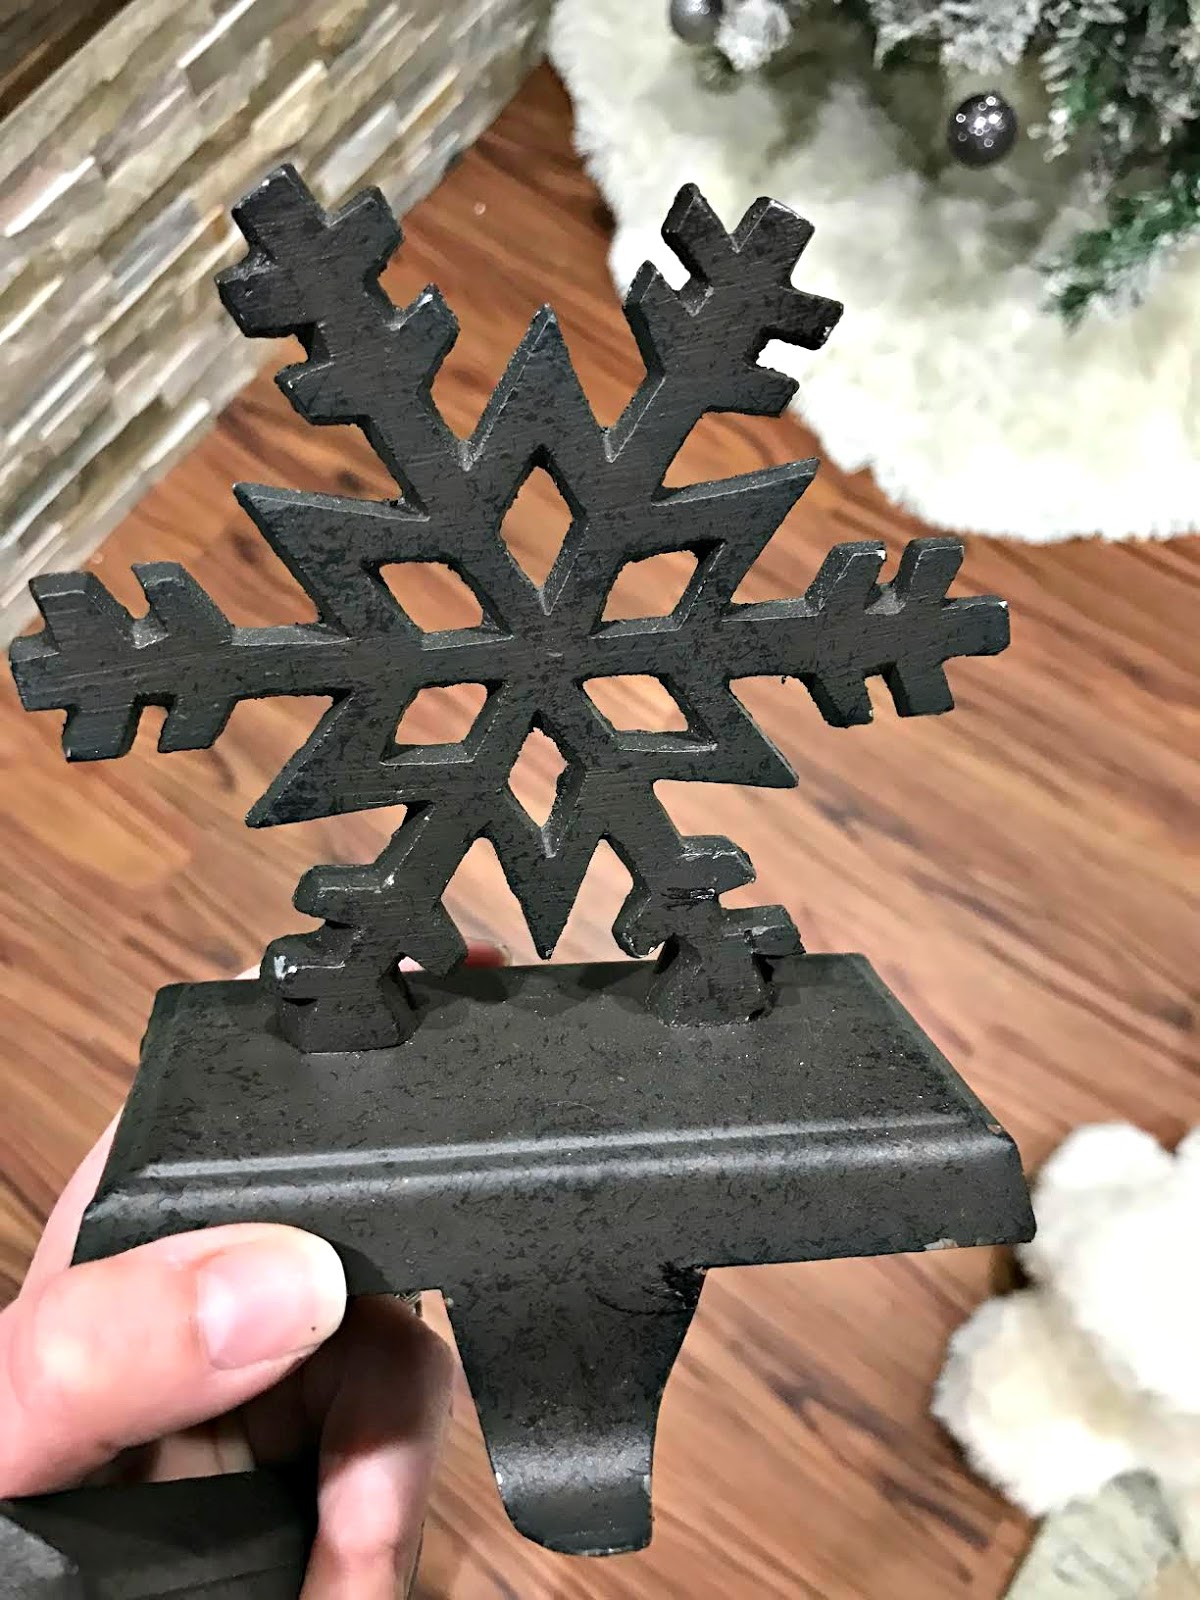
snowflake stocking holder

Some were in decent shape but some had areas where the finish was coming off: 
sanding metal for spray paint

I just took some sandpaper to those areas and sanded until the finish was smooth and not flaking anymore. 

Then I sprayed with my old go-to spray paint, oil rubbed bronze: 
oil rubbed bronze

They turned out as good as new! You may have noticed them on the new fireplace in the basement: 
stacked stone fireplace DIY

I ended up moving them upstairs to the family room fireplace: 
gray fireplace and built ins

I also found this CUTE wood reindeer set: 
modern wood reindeer

I loved their modern shape! I took the old bows off and sanded them down a bit -- they were pretty rough. Because of their rough wood I knew spray paint wouldn't cover well, so I grabbed my favorite red paint for Christmas: 
Santa Red paint

You can't go wrong with Santa Red! :) 

I did a couple coats -- still letting a bit of the wood grain come through: 
wood red reindeer

I added some bows just to see how they looked but I think I like them without better: 
red wood reindeer

I spent about $15 on the four stocking holders and the reindeer and the makeovers were easy! The deer are my favorite because they are so unique and fun. :) 

This isn't your regular thrift store...check out some of the photos I grabbed from my visit: 
brick and industrial lighting

Currier and Ives set

vintage Christmas tree

industrial store set up

mission 27 resale store

If you live nearby I would give Mission 27 visit -- the location is massive and they have an incredible selection. (Their women's clothing is crazy good.) This location is near Midland Antiques, another favorite of mine, so you could make a day of it! :) 

I plan to be back before Christmas but not making any promises! Depends on how much wrapping I get done. ;) Hope you all have a wonderful and safe end to your week! 


Hello there and happy Friday! It's the start of our favorite few weeks of the year! Our family is together, no one is traveling, no school, homework or basketball...it's a welcome relaxing time after a lovely but busy year. 

I'm joining in on another fabulous Christmas tour today and this time we're sharing our "welcoming" spaces -- front porches and entry ways. The lovely Chris from Just a Girl is our host and you NEED to go see her amazing front porch! Wow. You can see the majority of our holiday house from last week and the other wonderful bloggers involved in that tour here. Stay tuned at the end of this post to see the other ladies on this week's tour and be sure to check out the talented Jen from Tatertots and Jello next! 

I'll try not to talk too much and let you enjoy the photos -- I will link to related posts under the photos if you want more info!

Our front porch is super tiny and years ago I embraced it and decided to decorate it like a big porch. ;) I wish we had something bigger to dress up but ours always looks festive with greenery and red touches: 
greenery around doorway

I usually add more greenery around the door, but this year I put it around the railing instead. It's a lot quicker to do the latter and I'm all about simple and easy this year!

I LOVE our shutters and love dressing them up for the holidays. I just tack up the ribbon from both the top and bottom:
greenery and lights outside Christmas decor

I really wanted some lanterns for our extended steps this year, but haven't found anything I trust to leave outside. I'm hoping to find something next summer. 

Lynch Creek Farm sent me this gorgeous wreath this year and it is SO so pretty. I chose the traditional look with pine cones and red accents and I'm in love with it: 
Lynch Creek Farm wreath

The "merry" was a wood sign I found at the Target dollar spot that I spray painted red. I just nestled it inside and I love how it looks!

Of course I love the outside even more when the sun goes down! (Which seems like 4 p.m. lately.):
decorating shutters for Christmas

decorating a small porch outside

I love driving up to our home all year, but this time it's extra special. :) 

Here's a look inside the front door: 
black interior doors

That tile is coming up in 2017! Whoot! I've been waiting years to replace it and I can't wait! 

I was pretty low key with this space since just to the other side stands our giant Christmas tree: 
fa la la art

As you can tell, I have a thing with blue. A color I used to hate in my decor! ;)

I love our simple, pretty nativity set: 
neutral nativity set

The fluffy wreath was from HomeGoods:
foyer decorating ideas

You can see how I made those snowy candles with dollar store candles here: 
snowy DIY candles

You don't see our staircase right when you walk in, which was something different about this layout that I loved when I first saw it: 
black accent wall

I've had a lot of fun with these stairs over the years! 
white risers stained treads

Christmas decor on stairs

taking carpet off stairs

And in the evening!:
Black wall on stairs

I get asked about those grids on the wall a lot -- they are actually old window grids I found at Goodwill years ago. They sat in our garage forever until I made some changes to that staircase wall earlier this year:
JOY letters at Christmas

old window grids as art

Adding my jars filled with fake snow and tea lights is one of my favorite additions every year!:
lanterns on stairs Christmas

Just around the corner is the staircase to our basement. I dressed it up with a wreath on the mirror and then hung our DIY Pottery Barn count down: 
DIY wood wall

You'll notice the advent is empty -- it's been a crazy month. ;) 

I shared our newly painted mud room a few months ago -- I absolutely LOVE it. It was worth all of the work to paint every single surface in here!: 
white beadboard mud room

That room has been completely finished for some time and I need to share the full reveal with you soon! 

It may not look like it to some, but I really simplified our decor this year. I've said it before, but some greenery and pops of red are all a room needs to make it feel festive! 

Make sure to visit all of the following talented ladies as well! If you're slowing down this weekend, this is the perfect way to spend a couple hours...with a fire and mug of hot chocolate! :) I will be back over the next two weeks sharing plenty, it just may not be as often as normal. 

outdoor Christmas decorating


Monday


Wednesday


Hey there all! Again, thank you so much for your kind comments on our fireplace makeover and Christmas home tour I shared last week! I have a fun and easy little holiday craft for you today. 😊These are nothing new but I've always wanted to try making them. 

I gathered some votive holders from the dollar store -- they're actually a great, big size: 
dollar store candles

I used mod podge and brushed it on -- I'm guessing you could use Elmer's glue too! You just want something that will dry clear: 
making epsom salt candles

Then I poured Epsom salts into a plate and just dabbed the votive into a pile of it: 
How to make epsom salt candles

This is the brand we use (we already have it for soaks in the bath after work outs) and that price (linked) is the best I've found!: 
Epsom salt candles for Christmas
I used my glitter tray and knocked the excess off -- this tray is great because you can save the leftover glitter (or salts!) and put them back on the next item: 
glitter tray Martha Stewart

Speaking of glitter -- a few shakes of that in the Epsom salts pile would be beautiful too! 

They are cute and snowy just like this -- but they really shine (literally!) when you put a candle inside!: 
Epsom salt snow candles

This is such an easy and quick project and they are SO pretty all lit up! Pictures don't do them justice:
DIY snowy candle craft

You can amp this up even more though -- I think this is a lovely idea for a holiday party and I plan to use this for a big one we have in a couple weeks. 

Grab some cranberries and floating candles: 
Christmas candle ideas

You can keep frozen cranberries (for this purpose) forever! Fill your votives with water and cranberries and place a floating candle inside: 
Epsom salt candle project

DIY Epsom salt candles

They are so festive and pretty! Perfect for a holiday table setting or on a buffet: 
cranberry candles for the holidays

I love the red with the snowy texture -- and of course you can't go wrong with candles this time of year: 
cranberry epsom salt candles
You can refreeze the cranberries since you're not eating them. 

Have you tried making these pretties? I made five and for $5 because I had everything else I needed. You could easily reuse food jars for this project too!
DIY snowy candle craft

I made them all in about 20 minutes. Quick, easy and cheap -- my favorite kind of decor! I don't know if they will store well -- I imagine I will probably have to touch up the salt from year to year but I'm fine with that. 

If you've made these feel free to share them in the comments! I'd love to see different versions. 

Affiliate links included for your convenience! 


OH my goodness! I mentioned the other day that the past couple weeks have been crazy around here -- I'm scratching that and making that the past three weeks. ;) I haven't done a holiday tour on the blog for a while because it's so much work in such a short amount of time, but I have to admit it's pretty awesome to be completely done with everything! 

Usually I'm messing around with the decor till right before Christmas and I think this is the first time ever (at least while blogging) that I'm done so early. Yes, I consider the 9th early. 😂 I'm so stoked to be able to just sit back and enjoy it all now! 

I'm joining in with an incredible group of bloggers to share our Christmas homes with you this week -- I hope you'll check them all out at the bottom of the post today! I am so impressed with their beautiful homes and I know you will be too. 

For now, I'm just going to share the meeeellions of photos I took and won't say much. I'll link to certain projects and rooms under the photos. I have to first say how thankful I am for your kind comments on our stone fireplace I shared earlier this week: 
DIY stacked stone fireplace

If you'd like to see more pics or find out sources for anything, check out that post. I'll be getting to your questions today! 

Now, onto the rest of the house! Well, about half of the house. I am joining in on another tour next week and I'll show you a few more spaces then. For now, enjoy!!
living room decor at Christmas

open concept living room


blue dresser in living room
(Check out more posts about our living room here)

I told you our tree was a beast!! It's a workout to get it decorated but I do love it when it's done! I have big plans for these walls next year...I've been planning this project for years and I'm putting it on my list for 2017!
Christmas living room decorating

I've been leaning towards a combo of red and brown over the years and this time I went all out on the main tree -- only those two colors and I ADORE it. I bought some faux fur and just threw it under the tree as a skirt: 
red and brown Christmas tree
(More on the blue dresser here)

fa la la la la prints in frames

My fa la la pics are a favorite -- I put them up every year. I just printed them out on the computer. :) 
fa la la prints

red truck under glass

I added a few Christmas touches to the office/craft room I finished up a few months ago: 
ribbons on Christmas tree

I grabbed gold ribbon and just tied it on the branches. Pictures don't do it justice -- it's so pretty on the white tree! 
ribbon tree

DIY two sided desk with storage

joy boxwood wreath

The dining room turned library got a few touches -- overall I scaled back yet again this year. The older I get the less stuff I want to put out. I'm on track to get rid of at least one more large storage bin this year. ;) 

I've found the trees and adding greenery and touches of color with ornaments make a room feel plenty festive!
DIY bar cart

beaded chandelier from World Market

fairy lights in jar

Love that bokeh! 💛
DIY built ins

The family room got a ton of greenery on the mantel and a few other fun touches: 
gray fireplace herringbone tile

dollar store tree

Santa hat craft

My Santa hats are still one of my all time favorite crafts!
Christmas vignette with Santa hats

Peanut Butter


Christmas family room

red and brown Christmas decor

dark gray fireplace

And of course the kitchen...I love decorating this room! I went all out last year but toned it down a bit this year. I think the simple wreaths in the window seat are my favorite:
how to add a window seat to bay window

Love those dainty bows! (I just hot glued them on.)
DIY window seat

DIY wood hood vent

two toned Christmas kitchen

I showed you our favorite new Christmas tradition a couple weeks ago -- the hot chocolate station!

Simple touches of green and red go a long way:
how to extend cabinets to ceiling

open shelving and cabinets in kitchen

large chalkboard wall

It's fun to play with the chalkboard during the holidays!
chalkboard wall in kitchen

window seat in kitchen

This year I hope to do a small holiday tour of our home at night -- I think it's even prettier then!: 
double black doors

Whew!! I hope you enjoyed the tour! I always try to make it worthwhile for all of you, I hope I inspire you in some way. :) If you want more photos throughout the season that I don't share here, be sure to follow me on Instagram or Facebook. 

If you have questions about anything I didn't link, please let me know! Now check out the rest of the ladies on the tour today and this week! I can't wait to look at all of them with a cup of hot cocoa in hand!


Popular Posts