Tampilkan postingan dengan label before and after. Tampilkan semua postingan
It's been awhile since I've gotten down and dirty with a DIY project and I jumped back in big time with this one! It was SO fun! :) 

My whole family thinks I'm nuts by the way. Husband came home from a business trip and son came home from school to this happening...they know by now to expect this. 

I've talked about the changes I've wanted to make in our son's bathroom for years now. I mentioned in January that THIS was the year we were going to make it happen. My plan was to add a window in the back room first, and then determine if I wanted to take the wall down:
Two room bathroom makeover

But I knew all along I wanted to take it down...I hate it. Loathe. So yesterday I got a wild hair and did just that. Sometimes I'll sit on a project forever until I just bite the bullet and just jump in. I knew I could make some progress on this room and still have it function, so I went for it. 

And man, was it fun! And messy! I loved it. :) 

I knew there was some electrical in the wall, but didn't think there would be any plumbing. I was right...kind of. I started on the toilet/tub side of the wall (in case there was no way to take it down and I would have to patch it up) and made a hole...and immediately saw it. DRATS!:
How to check inside a wall before removing

It's a vent to the roof. I'm not sure if it can be pushed back into the wall, but even if so I don't think the expense is worth it. So I immediately figured out a solution, which I'll show you in a bit. 

I used a flashlight to look both up and down in the wall to make sure there was nothing else to worry about and kept going. 

A professional would be a little more deliberate (clean?) with the way they did this, but I went the easy/messy route. Using a hammer, I pounded through the drywall: 
How to remove drywall

And then I used a saw to cut through it. I did it in sections so it's not the cleanest of jobs, but it will all be fixed later: 
Saw for cutting drywall

There are so many drywall fixes that will have to happen in here, I wasn't worried about perfection. I knew how to take down a wall from when we did this in our family room years back. 

Once I saw that light coming into the dark cave in the back I was SO excited: 
How to remove a wall

The more I removed the happier I was. Whoot!:
Removing wall in bathroom

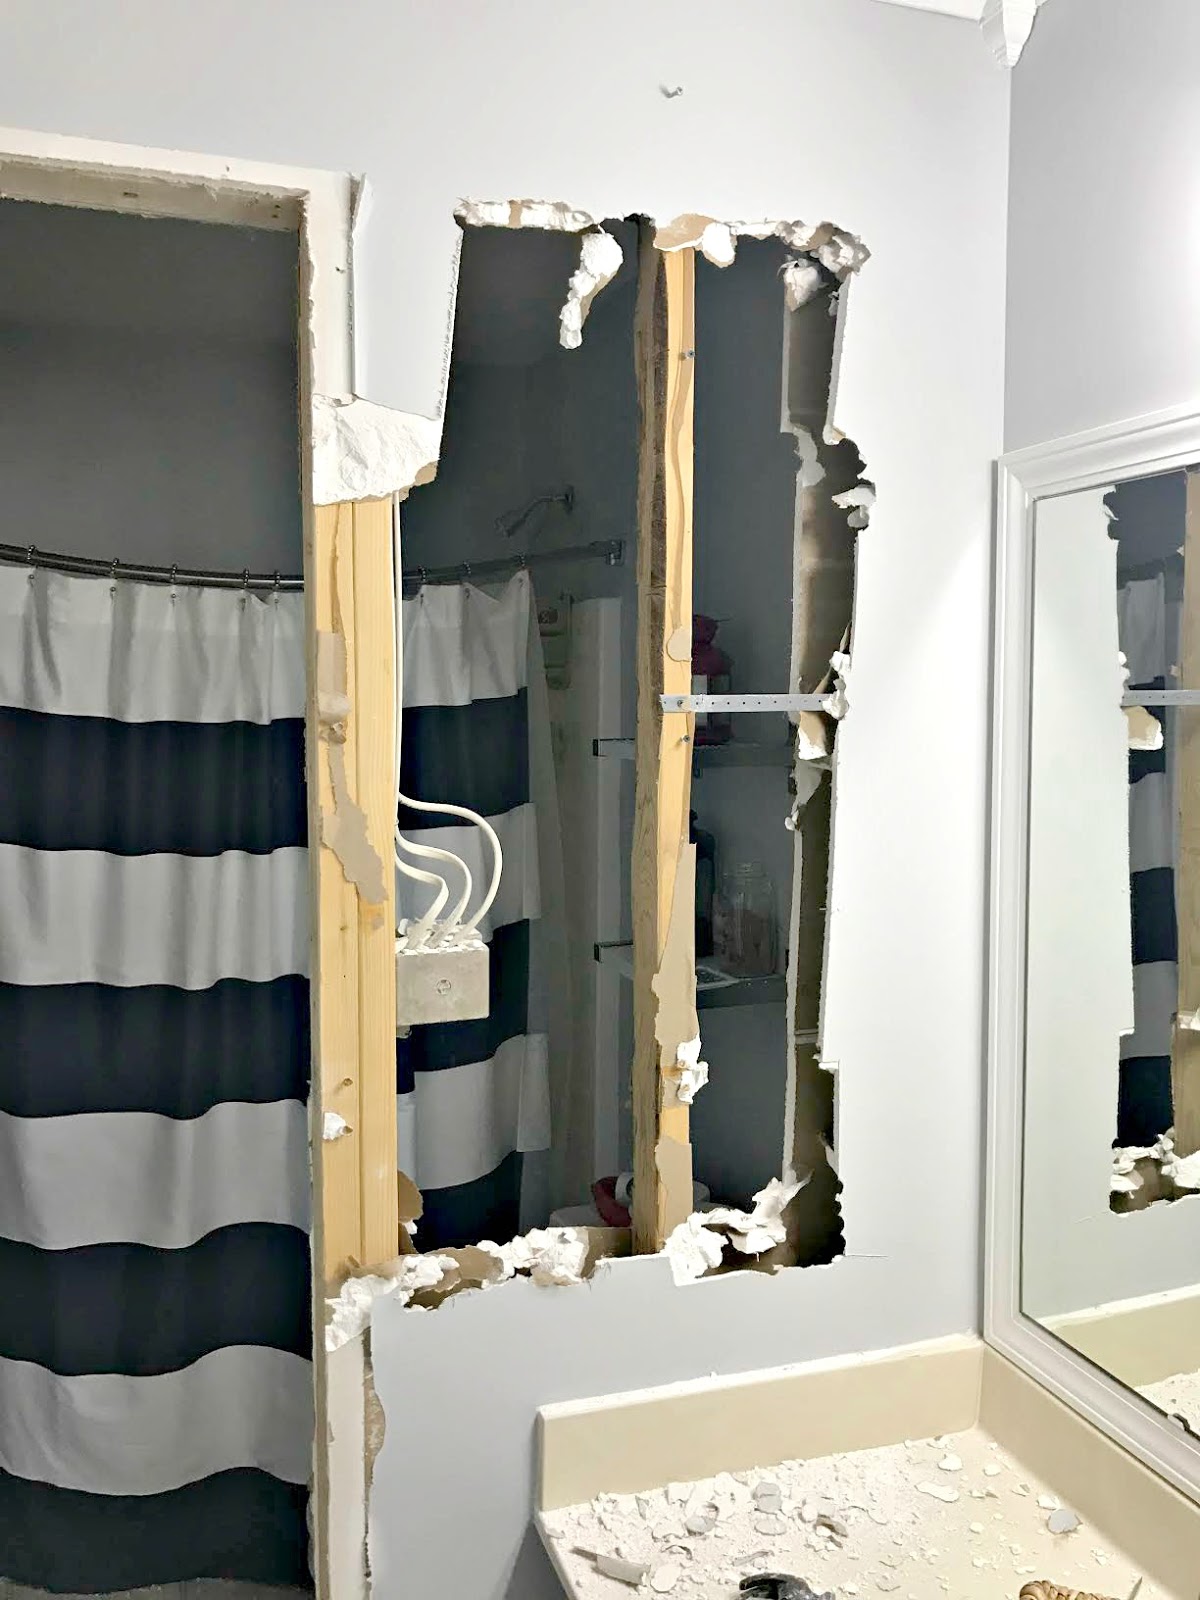
It was about here where I realized something -- I wasn't sure I wanted to take the WHOLE wall out. I was planning on it all this time but I really liked the idea of a small pony wall there. So I used (affiliate link) this reciprocating saw to start cutting through the studs, and I liked the idea more and more:
Removing wall down middle of bathroom

How to take down drywall and studs

Ignore the sad droopy shower rod. That's on the list. And yes, I left all of the stuff in the room and it was fine. I wiped off the dust onto the floor and then swept it all up. It was actually a quicker clean up than I thought it would be. The mess was welcomed though -- I was so thrilled!

Here's a closer look at the vent...
How to deal with vent in bathroom wall

My plan is to add a stud in front of it and then drywall around it. I may wrap it with stained wood to make it look like a beam -- I'll see when it's drywalled if I want to do that or not. I'm actually not so sad about the vent, because it gives me a good stopping point for the tile behind the mirrors that I plan to add. 

The pony wall will be shorter than this (guessing around three inches shorter) and I'm going to pull the studs out at the end and take it back about five inches:
Pony wall in bathroom by toilet

I didn't want any wall there initially but now I don't mind the idea of a short one. It will still offer a bit of privacy, but again, I'm not sure if that's really needed? I mean, you'll just shut the door. 
How to remove a wall in a bathroom

BUT I think because we have to keep that little bit on the right, it makes more sense to have the half wall there. It would look odd to just have that small wall going down the middle of the room by itself. 

And I've seen all kinds of great ideas for adding storage in bathroom pony walls too -- I may consider something like that!

It only took me a couple hours to get it to this point! Today I plan to take down the door trim and stud on the left side of the room and I'm excited about that too -- I think that will really complete the open feel. I'll take down the wood on the ceiling too, and I may go ahead and cut down the width of the pony wall so I can be done with this step. Here's a look after I finished cleaning:
Removing a wall to open up bathroom

GIDDY!! 

The opening will be much larger by the time I finish up today. Can't wait!! My arms and wrists are already killing me so I just want to get this part done. The next step will be getting quotes for some electrical and plumbing work. I'll be sure to share the process with you every step of the way! 

I had to laugh as I looked back at my inspiration photos I shared years back -- this room is set up nearly the exact same way as how ours will be!:
Bathroom renovation with pony wall

So weird that this is one I shared! Ours won't have the header at the top, but the bump out on the left and the pony wall are exactly how our room will look. And we're adding a window (longer and thinner than this one) to the top of the shower wall. 

I'm so excited to get this moving -- I have NO idea how long it's going to take me but like always I'll be doing it in smaller increments for budget reasons and so we can still use this room along the way. (Although I've told our boy he can't use the back part until we get that electrical back in the wall -- hopefully soon!)


Hey all! I'm back to show you some updates I've made in the family room lately! I'm so so stinking happy with them. 

You may remember how we knocked down a wall years ago and nearly doubled the size of our family room. We doubled the length of the room but it is more narrow than it used to be because of that. We didn't buy any new furniture when we made over this space and instead made what we had work for the room. 

We had two arm chairs in the room -- one in this cozy corner: 
Corner windows with chair

And one off to the other side, closer to the sofa: 
Arm chair in family room

That corner by the windows used to be where I'd sit and work every day, but I haven't used that space in quite a long time since I finished our office/craft room in the loft. That corner was such a cozy spot but felt so detached from the room. When we had company of course it was empty because no one wanted to sit by themselves. ;) 

I knew since we finished the makeover years ago that I wanted to add two matching chairs at the end of this room, but it wasn't a priority. So occasionally I would search and see what I could find for a good price. I never found anything that was the price I wanted and the style I wanted at the exact same time. 

Until I came upon the Rotterdam chair from Wayfair a couple weeks ago:

It checked off all of my wants -- classic design, neutral color, simple look -- and the nailhead trim was just the icing on the cake. :) 

I rarely buy chairs online -- I'm not sure I ever have actually. I like to try them out first. But the reviews were great and the price was right so I went ahead and ordered. (Side note -- they were supposed to be two-day delivery but I ordered at 6 p.m. one night and by 8 a.m. the next morning they were on our porch!)

We had a small candlestick table I made there before, but I wanted something a little lighter feeling between the tables. (I moved the candlestick table to another room because I love it.) I found a small side table at HomeGoods on clearance but didn't love the kind of mottled gold look: 
Gold round side table

It's hard to see here but it was a bit harsh -- I wanted to tone it down a bit so I sprayed it with gold spray paint. Perfect!!: 
Gold spray paint

So much better! 

I get asked a lot if it's OK to mix metals in decor. I say absolutely! It could get boring if you didn't: 
Mixing metal finishes in decor

I had already moved the floral art down to the basement bathroom, so I hung three frames in this spot instead and LOVE them. This is all in between here so bear with me -- there are not photos inside just yet. :)
Matching arm chairs in family room

We love having the extra seating in here and you can see the TV from both spots. I was surprised how it opened up the room too. You'd think it would feel more closed off but it's the opposite. Having that corner open makes it feel so spacious: 
Affordable neutral arm chairs

It's so nice to be able to get to the window shades to open and close them. It's the little things. :) And we have plenty of room behind the chairs to utilize the dresser. The backs on the chairs are low enough that it keeps everything open and airy. 

By the way, you can see how to care for the beautiful fiddle leaf fig here. I brought this one down from our bathroom to fill in some of the space and I love how open and simple this corner is now:
How to grow fiddle leaf fig

He seems to love that corner. Hopefully he'll love it as much as he did the bathroom! 

Now I just need to decide on a fabric for the pillows. I already had this one but I used the last of my fabric to make it: 
Neutral arm chair with nailhead trim

I can get more but would have to buy a yard which is way more than I'll need. We'll see -- thankfully I already have another matching insert for the other chair. 

I have some other minor changes in mind as well, including drapes. I love these but have had them for a very long time and am ready for a different look. They were the perfect height before I trimmed out the windows but now I'd love them to be longer so I can hang the rod a couple inches higher. I'll be tweaking some things as the budget allows but I'm so thrilled with the addition of these chairs! They completely change how the room looks!: 
Neutral arm chairs family room

Oh, and the chairs are great. Again, they are the Rotterdam from Wayfair and they come in a bunch of colors. The fabric is a little bit rough -- not the softest, but so far has been easy to clean. And the cushions are nice and thick and bouncy. You don't fall into them but I know they will soften up over time. The chairs are comfy and deep -- I like a chair I can sit in and pull my feet up and these are perfect. Even with all of that they have a nice small profile which I love. (And if you get these watch for stray nailheads in the packaging -- we had a few extra ones that fell out and I'm glad I found them before stepping on them!) 

And one of you smarties noticed that I switched out our rug when I reviewed our sectional sofa a few weeks back. Our previous rug in here was great but we got it for our old family room. It was so large it covered nearly all of the hardwoods in here. This slightly smaller rug (used to be in our library) lets the floors show and makes the room feel so much bigger! I love how it looks in here too. 

Moving some stuff around and adding these chairs makes this feel like a brand new room and we LOVE it! :) I'm so glad I waited till I found the right chairs! 

Do you ever buy furniture online? It always scares me but I'm pleasantly surprised with these. 


Hello my friends! Welcome to a new week! I'm back with the before and after link up for this month. If you're new to this shindig and are a blogger, be sure to check below to see how to link up your favorite before and after after projects! And if you're just a reader, you'll find plenty of inspiration below as people link up their projects. 

I like to share a few of the projects from last month that caught my eye first! Carrie's bathroom makeover was a BIG transformation!: 
Beachy bathroom makeover

You really have to check out the before to see how much it changed!

Carli hit it out of the park again with this SMART and pretty coat closet makeover. It's a total command stations now and I love how she used the back of the door:
Command station coat closet

You have to see how the inside looks too -- love it!

This is brilliant and so easy -- Jenn shares how she hides the electrical box in her pretty laundry closet:
How to hide electrical panel

I love all the navy blue touches in here too! 💙

Angela shared how they created some great storage in an awkward spot by their stairs
DIY toy cubby storage under stairs

I loved that it's tiered to fit in with the stairs but offers as much storage as possible for that spot. 

I LOVE Jennifer's use of color and the pink (that door!) looks SO good with the black and white touches in her new bathroom
Pink, white and black bathroom makeover

I don't care what color you paint your doors -- but do it. ;) It adds so much character to a home! See how I've done it here.

Continuing with our color trend, I loved the awesome storage and pop of blue in Cynthia's light and bright bathroom:
Painted wood cabinet for bathroom storage

She repurposed and old cabinet and this looks amazing! And the storage is great if you don't have a bathroom closet.

Haeley shared her fabulously organized craft closet:
Ultimate craft closet storage

Organized bins and labels make me happy. And I love that you can still see all the color and what's inside each one!

And finally, I was swooning over Melanie's classically beautiful dining room:
dark neutral walls white trim dining room

I LOVE that color -- it's so soothing but looks fantastic against the white trim. I just love this space!

There you go! Some of my favorites from last month -- if you'd like to be considered for next month's share, please add a link to this post or to TDC at the bottom of your blog post. Or you can just copy and paste the code here into your post:

<div align="center"><a href="http://www.thriftydecorchick.blogspot.com/" title="TDC Before and After" target="_blank"><img src="http://www.homestoriesatoz.com/wp-content/uploads/2012/03/beforeAndAfterButton_thumb1.gif" alt="TDC Before and After" style="border:none;" /></a></div>

Now let's see what you've been up to lately! Please link up only you're own projects and/or makeovers!


As many of you know, it can take me eons to finish up a room makeover. It's usually because of two things -- we pay cash for everything so I only make updates as the budget allows. And since I try to do most of it myself, it just takes longer than it would if I hired out. I don't mind this usually because I think I make better decisions when I take my time. 

I'll take even longer if it's a room we don't use often (like our guest room) or one that we use mostly (and guests don't see) so I'm not as concerned about it getting finished up quickly. I've been working on our mudroom for more than three years now -- well, even longer than that if you consider all of our changes -- but I've been making updates for a few years to get it the way I want it. 

And it's FINALLY DONE. Whoot! You may have seen the most dramatic changes I shared last fall, but I wasn't calling it done till we got the storage shelf built and finished up. Now it's finished and because this room looks so different from where we started, I'm sharing a bunch of before and after pics. (My favorite!)

This is one of the biggest transformations in our house, but probably one of the simplest in terms of what we did to change it up. When we built our house the laundry room and mud room were combined. And I hated it from day one because no matter what we did, it looked like this every day: 
Mudroom makeover BEFORE

You can't tell from that pic, but I had already made some changes to the room. I painted it yellow with black accents way back in the day, and then installed inexpensive vinyl floor tiles

What you CAN tell is that the room was a disaster. ALWAYS. It drove us both crazy. There was no closed storage, there wasn't enough room and washer and dryer became our dumping ground for everything

Thankfully, when we finished our basement we added a laundry room. When people ask me if we mind it in the basement I cannot help but express my JOY. ;) We actually quite like it down there (upstairs would be awesome, but we were working with what we had) and I love love LOVE that it's out of this room now. 

Later on I made some additional updates like adding more beadboard around the room where the washer and dryer were, we had some sconces added, and I built the DIY mud room bench:
Mudroom bench made out of kitchen cabinets

Oh my, I miss that fluffy cat every single day. :) 

I was trying to do something different than my normal style with that peacock blue trim and walls, but I grew tired of it. Although I still LOVE that color, it just wasn't our style and didn't mesh with the rest of the house. 

Last year I took on the huge job of painting all the trim and the walls. It made a HUGE difference:
Canvas market bag

There were only two things left that I wanted to tackle -- storage above the bench and crown molding. Last fall we got help with the simple cubby build and then I painted that and the crown molding. 

I looked for weeks to find the right storage baskets for the shelf and ended up with these cubbies from Target instead: 
Pillowfort Target wood cubbies
I ended up staining them and adding metal house numbers I found at Home Depot to the front. NOW the room is done!: 
Bright laundry room turned mudroom makeover

I wish I would have gone a little lighter with my stain on the cubbies -- it's the same color as the bench but that soft wood soaked it up! I just love them though -- they are easier to access than baskets and I love how they look! We use a small stool to get to them and as I mentioned, they hold items we don't need to access very often. 

I've kept the decor in this room really simple -- and the storage is simple as well. The bench holds our shoes, there's a metal basket on the wall that holds items we need to take out to the car and the cubbies above hold off season items and extras. It's a perfect spot for random stuff in our house! I'll list all the items and the paint colors at the bottom of the post. 

When I started the process of transitioning from the black and yellow to the dark blue and light walls, I added my craftsman/farmhouse trim to the three doorways in the room. I also went light blue with the door, which I didn't love long term:
Light blue interior door

I switched some lights around in the house and removed the fluorescent light we had in here. This small chandelier used to hang in our closet: 
Peacock blue walls with trim

I kept trying to live with the peacock blue, but it just wasn't meshing. We have black doors throughout our house and once this one went black I knew it was the right move: 
Black interior doors

You can see here that I never moved the washer and dryer to paint the room yellow 😬: 
Moving the laundry room

And no one knew till we moved them. ;) This room felt SO MUCH better just with the simple addition of hooks there -- like it was supposed to function this way all along. 

I painted the room white and we added a bench for storage for awhile: 
Making a laundry into a mudroom

And now that same angle looks like this: 
Laundry room turned mudroom makeover


Light mudroom with wood accents

Our mud room is actually fairly large -- but half of it is a long hallway by the utility closet. Years ago I changed out the inexpensive metal folding doors that we used to have:
Black and yellow laundry room

To some nicer wood ones -- I added the handles to them and it was an easy upgrade. You can see how I changed out the door trim here as well:  

When I painted the room last year, I simplified the art wall straight ahead with one pretty piece instead. We have enough going on with the IKEA command center I installed (and still love):
IKEA wire art display

The addition of crown molding made a big difference in here: 
Bright mud room makeover

I LOVE that I don't even mind that utility closet anymore -- it used to stand out like a sore thumb. I considered spraying them the dark blue color years ago and I'm so glad I didn't! 

Here are some final looks at this space -- I'm so pleased with it and as always, I did the majority of the projects myself and we only made changes as we could afford them. I'm so glad we waited too -- now it functions perfectly for our needs. We didn't need a TON of storage in here -- hooks for coats, a spot for shoes and storage for odds and ends were all that were needed: 
DIY mud room storage

Beadboard mud room with blue walls

Bright and light mud room with DIY bench

Classic white mud room with black door

Changing out the light bulbs to daylight bulbs makes a HUGE difference too. This room doesn't get any natural light so the new bulbs make it feel so much brighter.

Here's a list of the items from this room -- some were purchased years ago but I'll add them anyway:

Utility doors: Lowe's
Wood cubbies: Target (Pillowfort line)
Metal numbers: Home Depot
Magnetic bird key holders: Container store (this option (affiliate) is cute too!)
"Exit" sign on door: HomeGoods
Sconces on wall: Lowe's (see more and a link here)
Pillow on bench: HomeGoods
Metal basket on wall: HomeGoods
Hooks on wall: Home Depot
Command center: IKEA
Art: Target

Paint colors: White, Pure White by Sherwin Williams
Walls: Krypton by SW
Door: Graphite by Benjamin Moore, mixed in SW

Let me know if I've forgotten anything!


Popular Posts