Tampilkan postingan dengan label Goodwill. Tampilkan semua postingan
Hey all! Hope you're week has been wonderful! I've been incredibly lazy and it's been amazing. :) I've got a few more errands to run and a ton of wrapping to do over the next few days so it's time to get productive again. 

I have some super quick thrift store makeovers I wanted to share with you that I got at an awesome new store (for my local readers). 

The lovely folks at Mission 27 Resale in Indianapolis contacted me a few months ago and asked me to come out to visit their new location downtown. Mission 27 is run by the Society of St. Vincent de Paul, which is an organization that serves the poor and disadvantaged. I LOVE their mission for this store in particular. The lovely folks that run this organization noticed that the food that was being given out at their food bank wasn't always the healthiest of options (because of the cost). The proceeds from this store go to buying healthy foods for the food bank, among other things. 

ALL of the items in the store are donated and it is HUGE. I have to tell you I've never seen nicer items in a thrift shop! I can't wait to go back when I have more time to shop around. 

I grabbed a few treasures that I made over with spray paint for the holidays! They had a bunch of these stocking holders -- I got rid of ours last year because they were falling apart: 
snowflake stocking holder

Some were in decent shape but some had areas where the finish was coming off: 
sanding metal for spray paint

I just took some sandpaper to those areas and sanded until the finish was smooth and not flaking anymore. 

Then I sprayed with my old go-to spray paint, oil rubbed bronze: 
oil rubbed bronze

They turned out as good as new! You may have noticed them on the new fireplace in the basement: 
stacked stone fireplace DIY

I ended up moving them upstairs to the family room fireplace: 
gray fireplace and built ins

I also found this CUTE wood reindeer set: 
modern wood reindeer

I loved their modern shape! I took the old bows off and sanded them down a bit -- they were pretty rough. Because of their rough wood I knew spray paint wouldn't cover well, so I grabbed my favorite red paint for Christmas: 
Santa Red paint

You can't go wrong with Santa Red! :) 

I did a couple coats -- still letting a bit of the wood grain come through: 
wood red reindeer

I added some bows just to see how they looked but I think I like them without better: 
red wood reindeer

I spent about $15 on the four stocking holders and the reindeer and the makeovers were easy! The deer are my favorite because they are so unique and fun. :) 

This isn't your regular thrift store...check out some of the photos I grabbed from my visit: 
brick and industrial lighting

Currier and Ives set

vintage Christmas tree

industrial store set up

mission 27 resale store

If you live nearby I would give Mission 27 visit -- the location is massive and they have an incredible selection. (Their women's clothing is crazy good.) This location is near Midland Antiques, another favorite of mine, so you could make a day of it! :) 

I plan to be back before Christmas but not making any promises! Depends on how much wrapping I get done. ;) Hope you all have a wonderful and safe end to your week! 


Hello everybody! How was your weekend? We celebrated my Bub’s 7th birthday yesterday – SEVEN! I still can hardly believe it, he was just my sweet baby the other day. (I guess he’ll always be, whether he likes that or not.)

Anyway, we have a big Christmas decor tour starting today – my friend Chris at Just a Girl is coordinating a Christmas tour of homes this week with nearly 25 talented bloggers showing off their holiday homes. I’m sharing mine on Wednesday and my house is far from done. Guess what I’m doing today? :)

So I did get the mantel done this weekend, and I absolutely LOVE IT. I started by placing my big fluffy garland up there, like always, and stood back…and it was just too much. I wanted something simpler this year.

So I thunk. And stood in front of my stuff in the storage room. And thunk some more. And stared, till it came to me. I grabbed the glass containers I decorated for Christmas a few years ago and started placing them on the mantel.

The candleholders (just glass from Goodwill over the years) were all silver so I needed to pull in some gold to work with our mirror. (I’m getting lazier smarter as I age and wanted to just leave that there – I don’t want to have to move everything out to decorate for the holidays!) I found a bunch more of the glass containers in my stash (apparently I’ve been hoarding them) but needed to cover them. I got an idea to look through my wrapping paper -- score! I found this gorgeous, PERFECT, faux bois paper I had picked up at HomeGoods months ago:

faux bois wrapping paper

Ugh. Perfect. It had the gold and touches of silver to tie in the other paper. I was never planning to use it as wrapping paper by the way – I always knew I’d find a use for it otherwise. I do this often.

I traced the shape of the glass on there, cut it out, then used double-sided tape to secure it:

wrapping glass containers

I had to run to the craft store to grab a couple more pieces of the silver scrapbook paper to finish off my collection, and then I filled in the empty spots with greenery and pinecones:

Elegant Christmas mantel

It is so simple, really. Wrapping the paper around will take you some time, but it’s SO easy and so dang cheap. The extra scrapbook paper I had to get was on sale, so I spent $2 to finish it up.

I really love how it turned out:

Christmas mantel with glass containers

It’s elegant and simple, and it lets the mirror shine. My fluffy garland made the mantel feel squatty and small. This opens it up quite a bit:

Christmas mantel

I used a combo of real tea lights and my fake candles/votives. I’ve had lit it all up every day and night since I finished.

The last few days have been cloudy and dreary and it looks so pretty, even during the day. But it truly shines at night:

Christmas mantel with Goodwill glass

I say this every year, but don’t be surprised if the mantel still looks like this in February. ;)

I love it that much: candles on mantel

Every one of those glass containers I've picked up at Goodwill. Well, actually I think I got a few from Hobby Lobby years ago for this table centerpiece. But most are from Goodwill over the years. I found the hobnail votives there a couple years ago too. (See how I used them for a fall tablescape here.) The few mercury votives are from Target and other stores over time.

The past couple of years I’ve used more and more real greenery to decorate for the holidays. You need to spray it every day or two (or not…sometimes I forget) to keep it from drying out but I love the way it looks and love that I don’t have to store it year to year. :)

Do you have a mantel or vignette you like to change up every year during the holidays? You can see my past mantels (and see how this space has changed over the years) here, here and here.


Hello there! How are ya?

So I sometimes dig my heels in on stuff when everybody else does it…it’s just my thing. I will avoid something that is super trendy just because it’s…well, super trendy. :) The same went for Instagram – it took me forever to get on the bandwagon but I gotta say I have enjoyed it. It’s fun to share snippets of stuff throughout the day, especially when I’m out and about shopping.

Some interesting conversations have started up on some photos, and the other day was no exception – it got me thinking:

Goodwill

The Bub and I popped into Goodwill before an appointment the other day and I gotta say…some of the prices were a little shocking. ;)

I am and will always be a thrifty girl, but you may have noticed I’m not the Goodwill shopper I used to be. That’s for a few reasons – I just don’t have the time for it like I used to. The kiddo is getting older, the blog is getting bigger and to find the goodies at Goodwill you need to stop in often. I use to stop by one two or more times a week and lately I just haven’t made the time.

When you stop in once every three months it’s hard to find the deals. ;) And when I used to go a lot and I would find fun stuff and it would come home with me and sit. And sit. (Forever.) Because I couldn’t pass it up of COURSE! And there’s only so much time in the day to transform things so the items would take up space in our house and in my head. I finally had to come to terms with it and STOP.

This Goodwill stool I redid with Annie Sloan paint had sat in my garage for a least a year before it got painted:

painted stool

You see, when you find a deal at Goodwill you have to buy it NOW or it will be gone when you come back – at least 90 percent of the time. And I had a lot of buy-it-nows cluttering up my house. :)

When our stores changed their return policy (you just get a credit back now), that also changed how often I shopped there. If I can’t just return it I won’t buy as much, plain and simple.

But the biggie is that Instagram photo up there – when I have stopped in over the past year or so some of the prices have been shockingly high. The response to that pictures was much of the same – many of your have noticed it as well.

Now PLEASE don’t get me wrong – I used to work closely with our Indiana Goodwill’s and truly believe in their mission and believe they do GOOD work. They provide hundreds of jobs for those who may not be employed otherwise. I also understand the price of everything goes up over time.

But every time I’ve walked through lately I am shocked by a price tag on more than one item. I laugh about it because I wonder if blogs have a little to do with it – over the past five years or so more people are seeing the value in transforming something old or worn and making it work in their home.

I don’t know what it is really, I’ve just noticed the prices have gone up considerably. Target sells some of their extra items to Goodwill and I’ll sometimes see prices at there for higher than you can get it on clearance at Target.

So…in a nutshell that’s why I’ve moved more towards antique malls and Craigslist over the years to find most of treasures. I find at antique stores you don’t have to worry quite as much about an item being gone…I’ve left many things and come home to think about them and they are still there when I return.

Craigslist is nice because when I want something specific I can search for it over time and wait for the right piece and price.

There are still a few go-to items I visit Goodwill for, of course. I love to use books when decorating and end up picking some up from Goodwill occasionally. I always find books I would actually read but it doesn’t hurt to find a pretty one. ;)

I picked up a few coffee table-style books to fill in the library built ins:

DIY built ins

And of course Goodwill is always great for frames, although even with those you have to watch the price lately. I love that I can find so many different styles and sizes all in one spot. I found a big one for the basement here and had a few on hand from Goodwill for the kitchen chalkboard:

blue and yellow decoratingmagnetic kitchen chalkboard

And most of the frames in my office were collected at Goodwill over time (and then painted white):

board and batten walls

I love that they look like just that – collected.

So are you still a Goodwill shopper? Never was? If you are, have you noticed the difference in price over the past year or so like me? I will continue to shop there and support their mission…just not quite as often as I used to.

**To see more of my Goodwill transformations, go here.


How to decorate above cabinets
Hello all! How was your Easter weekend? I hope it was wonderful. :)
We had a great one – as you can tell by the tuckered out Bub and dog:
cuties
:) Adorable.
I get asked a lot how to decorate one spot in particular – and it’s a tough one. High spaces in particular (plant ledges, above armoires) are hard, in my opinion. And the kitchen cabinets are no exception.
Our cabs aren’t super tall – we went with the basic height – so we have a ton of space above them. I tried leaving them nekked, but it just looks so unfinished and bare. And I love having a little somethin’ up there to add some personality and color to the kitchen.
I know some don’t like the decorating over the cabinets idea, and that’s cool. I really don’t need to know. Really…it’s OK.  :)
Last week I finished up another item on my kitchen to-do list…and it was a LONG time coming. I started our mini kitchen redo last May, and the looming one year “anniversary” is kind of kicking my booty in gear. I’d love to have everything checked off my list by the year mark.
You can see in this old pic that I had stenciled sayings above the cabinets:
Cherry cabinets black tile
I had a Tuscan theme going in the room and I chose words like “Family and Friends” and “Wine and Food” in Italian.
But a beadboard backsplash doesn’t exactly scream Tuscan, so I’ve wanted to get rid of those words foreva now.
So I started priming:

And I figured it would be an easy project, but like pretty much ALWAYS, one thing turned into another. That is how I roll.
Two coats of primer and two coats of paint later, and you could see where I had touched up the paint:

I was hoping that wasn’t going to happen, but it did so I rolled with it. :) I repainted the area above the cabinets with a quick coat of the lovely Sisal color from Ralph Lauren (Home Depot can still mix it for you!)
LOVE this color.
And then I moved onto another project I’ve been wanting to address for some time now – updating and rearranging the accessories on top of the cabs. And I wanted to get it done without leaving the house. (Or spending any cash!)
I started with Goodwill frame I’ve had for ages:
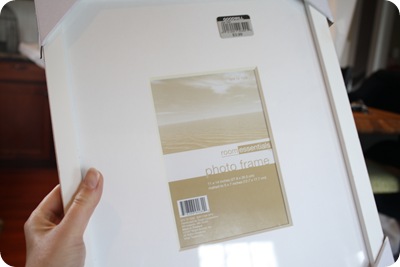
Goodwill frame
Brand new baby!
I found a Target placemat a couple of months ago that I loved, and knew just what I was going to do with it:

It’s plastic and was only $1.99.
I cut it to fit the frame, and ended up with this:
placemat art
So cute!!
You can see my little secret for propping up stuff up there:

Our little-used NYC book and my old AP Stylebook have a use again!
I only use old paperbacks, but on occasion Hubs will ask where a book is and I’ll answer, “Did you check above the cabinets honey?”
No lie. :)
That’s what it’s like living with me. He loves me so. (He must.)
:)
Anyhoo, next I focused on the blinding green tray I spray painted back here:

It. was. BRIGHT. Sheesh. Pretty much as soon as I did it, I wanted to change it.
I pulled it down and sprayed it with some yellow instead, but that pesky “S” was still showing through. So I thunk and I thunk, and came up with a (free!) fix to cover it.
I took some poster board, cut it to the size of the inside of the tray and then used a stencil to dress it up a bit:
Decorating above kitchen cabinets
It is SO not perfect – but remember it’s up high! And it was FREE. Me likey. 
I may get a piece of plexiglass cut to fit over it eventually, but it’s not going to be used so for now it stays as is.
I had to keep at least ONE word up there – the Italian was gone, but I had to add one more that’s near and dear to my heart:

Yes, I love to eat. I needed to proclaim my love, loud and clear.
These are cardboard letters from Joann’s (you can find them online here too) and they’ve been sitting up there unfinished for months. First I tried covering them with fabric, then paper, and then realized they were way too busy.
You can’t go wrong with good old black. :)
I saw this cage at Stein Mart a few weeks ago and couldn’t resist it!:
EAT letters
It was $20 and they had a smaller size too. LOVE!!
I also picked up this cutie little stool a few months ago (for $12) at TJ Maxx:

UGH, I love it! It matches the blue tray I used in the living room. I love how it pulls out the blue in the little cafe curtains I made a couple of weeks ago.
Some of the pieces I’ve had for a long time – the pear art used to be a wrapped canvas:

I cut it out and framed it in an IKEA frame.
Last year I picked up the round platter from IKEA as well:
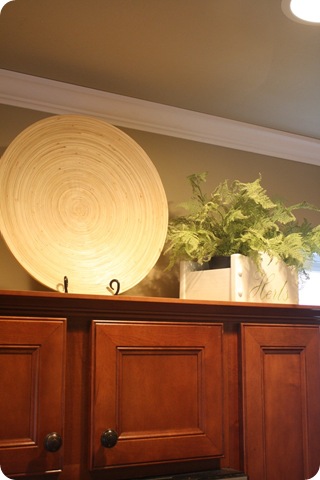
How to decorate above kitchen cabinets
And the herb crate was a little DIY project from last summer. I adore that little crate!
I learned while working in the decorating biz that your eye should travel up and down when looking at accessories, and I try to apply that above our cabinets:
Tips for decorating above kitchen cabinets
One tall thing, one shorter thing, one tall thing…you get it. ;)
Because we have so much space above our cabinets, I try to go with larger pieces to fill it:
Best tips to decorate above kitchen cabinets
And like any hard-to-decorate space, I always say to be PATIENT. Areas like this can’t be forced – it’s the kind of thing you fill as you go, when you find items you love, that are the right size, that apply to the space. (Trays, baskets and platters for a kitchen.)
You may notice one more little change…the ball started rolling and I couldn’t stop it.
I resisted, but it always wins out. :)
I FINALLY installed the crown molding in this space:

And I’ll tell you more about that when I finish the other half of the room (the family room).
I’m SO glad to have this done! Or at least up. “Done” is a bit of a stretch. :)
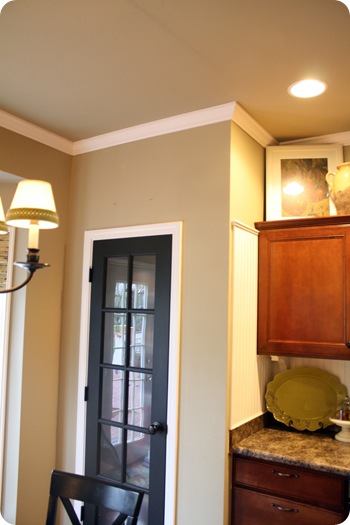
crown molding in kitchen
I may add a little detail to the bottom to chunk it up a bit, but for now, I’ll be happy if I don’t see our ladder again for a very, VERY long time. :)
So that, my dears, is how I decorate above our cabinets! If our cabs were taller, I’d do a lot less – probably wider, fatter items. But I love it and will probably not touch it for another year or five. And my kitchen list to-do is dwindling – WHOO!
How do you deal with up high spaces? Do tell!

I've also added accent lighting above the cabinets -- to see how to do that (the easy way) check out this post. See more updates to our kitchen since this post here and more of our home here. 

Affiliate links may be included for your convenience. 
SaveSave

Well hello all! Can you believe it’s almost the weekend already? I swear this week has absolutely flown by.

I got one project completed this week that I’m really, really happy with. (GLEE!!) And I did most of it with what I had, which is always a bonus in my book. :)

When it comes to filling wall space, we don’t have much real art in our home. OK, let me rephrase…we have ZERO real art. :)

An outlet Ballard Designs piece is the closest we get to actual art. Instead I’ve fill our walls with a bunch of molding and lots and LOTS of pictures. Bunches. Gaggles. :)

Photographs are my very favorite art. They’re cheap (most of the time I print them out at home and almost all frames are from Goodwill), they’re easy, and they add a personal touch to our home that no art could.

I’ve grouped framed pictures in almost every room in our house. The playroom:

playroom photo wall

See that squishy face? That’s my baby:

IMG_3162

The cowboy is my Dad as a boy. I could die. :)

That wall of photos is getting a redo soon. I may move the shelves around and am definitely adding new photos throughout.

I filled an empty wall on our stairwell with photos as well:

image

Don’t worry…the mice are gone. As much as I HEART them. :)

And I used photos in a wall in our bedroom as well:

image

You can see they’re usually hung willy nilly. I like the scattered look when it comes to framed photos, which is REALLY weird for me, since I’m the symmetrical queen.

When I started the impromptu redo of the living room, I knew exactly how I wanted to fill the space between the windows. I took at look at the colorway on the fabric I picked for the drapes for some color inspiration:

IMG_3208

I big fat LOVE when they do that! It makes it so easy to work with. You’ll notice there’s 16 different colors in this beautiful fabric, which gave me plenty of options to choose from.

And it turns out, I already had exactly what I needed. :) About eight months ago, I started collecting frames at Goodwill for an idea I had for the living room. I even spray painted them months ago – I bet it’s been about six months.

But when I tried my idea in the room, I didn’t care for it (more about that later!) and left it sitting for months. And wouldn’t you know it – the colors I had already painted the frames worked perfectly for my new idea:

photo art wall

I love using what I have. And I love it even more when the spray painting is already done. ;)

I started finishing off this spot with a Goodwill lamp – it was blinding me with it’s brassiness at the store, but I knew it could be a beauty:

Goodwill lamp

Doesn’t it have the loveliest curves? Oh, she’s so darn pretty. :) I sprayed it with a primer and then a couple coats of Rustoleum’s Heirloom White. I had the shade, and added a ribbon from my stash around the bottom. I love how the color in the ribbon is an exact match to the light brown in the drapes.

That is what I’m talkin’ about! Totally by accident and it worked great. Whooeee!!

I kept the accessories in the HomeGoods tray simple. I didn’t want them to compete with the art:

Homegoods tray

The rattan ball was a couple bucks on clearance at Pottery Barn years ago. The books are those faux books, and I covered them with a linen fabric last year.

The art is my very favorite part! They’re all shots I took (with my point and shoot camera by the way) last year:

I used a few of the wildflower shots (from our neighborhood) and a leaf from a hike last fall. I was going for bright colors that worked with the drapes. LOVE.

I don’t even use mats most of the time – I just cut out white paper and use spray adhesive or double-sided tape to mount the photos right on top. You can’t even tell they’re not the real thing!

Like I mentioned, I usually print my photos out at home (and usually just on basic printer paper), but this time I splurged a little bit. I uploaded them to Walgreens.com and picked them up an hour later.

Uhh, hello?? How have I missed this fabulousness all these years? I knew about it, just never did it. And I’m now hooked. I think the five pictures were about $12.

The new art is the perfect finishing touch for that part of the room:

I’m so in love with it. I smile every time I walk in this space.

There’s still much I want to do – not sure that mirror is staying on the right (it’s a little small). You’ll see a peek of a Goodwill coffee table that’s waiting for a redo. And there’s pillows to make as well. (I am going to attempt to make a pillow with a zipper people.)  ;)

And if you look close enough, you’ll notice the drapes are different lengths, still aren’t hemmed (will they ever be? I don’t know, I don’t know!), and there’s a few holes in the wall I need to paint over.

I was able cover most of those with the frames though. YESSSS.

Because you know I’m a lovah of before and after pics, let’s check out the difference so far, shall we? The dark before:

And with new drapes and a little reworking, the now:

bright living room

BOO.yah. LOVE it.

I know many of you are loving the fabric as much as I am – I got it from Calico Corners and it’s P. Kaufman fabric:

P. Kaufman fabric

I’m trying to find it online and haven’t come up with anything yet. I’ll let you know if I find a link!

So, do you use photos as art in your home? I know one thing – if we ever sell our house, the realtor is going to have a heyday with us. Aren’t you supposed to depersonalize? We’ll have LOTS of empty walls! Or they’ll just have to deal.  :)

P.S. The lamp shade on the side table was a vintage find years ago. Isn’t is perfect?

P.P.S. The spray paints/colors I used on the frames were Rustoleum’s Heirloom White and Espresso and Valspar’s Everglade.

**Adding this to my friend Melissa’s party:

image


Popular Posts