You all rock! I loved your responses to the bed making post. :) Thanks for the leads on sheets that fit the monstrous mattress – I’m going to check them out!

I get a lot of questions about what’s kosher when it comes to mixing metal finishes on hardware, light fixtures and faucets in houses.

First of all, I must say (again) – if you want to have 15 different finishes in your house, go for it. Seriously – if you like what you have then ENJOY. It’s YOUR house! Do what makes YOU happy.

Some in the “biz” say you should stick with one and only finish only for everything. So if your knobs in the kitchen are brushed nickel, the faucet, light fixtures, everything should be the same. But I find that can get a little bit monotonous. I think mixing them up a bit can be a very good thing. (And that may or may not be because my house is in a state of “mixed” right now.)  ;)

I currently have three finishes throughout our house – shiny brass, oil rubbed bronze and brushed nickel. I am not a fan of the shiny brass, and I am happy to announce (from the rooftops!!!) that we are shiny-brass free when it comes to the light fixtures:

brass

Pffffffttt…brass. You are dead to me.

OK, that’s a little harsh. Brass…I highly dislike you! Don’t let the door smack you on the booty!

I’ve also been working on replacing our brass door knobs with beautiful, dark oil rubbed bronze (ORB) knobs for the past six months or so. YES – it’s been a long process. That’s a story for another day.

But once those are gone, I will be free of the brass.

Can I get an AMEN?!

Anywho, I still count the shiny brass as one of the finishes in our home because we do have a few doors knobs left to replace.

Otherwise, we have a mix of the brushed nickel/chrome/stainless finishes (I group those together) and ORB. The chrome I am not a fan of anymore – it’s starting to give me brass-like hives. We only have it on a few of our sinks, so for now I’m able to handle them.

For NOW.

So the million dollar question -- can you mix metals within one room?

I say YES, abso-posi-lutely you can. In our kitchen, I chose ORB knobs and handles for the cabinets:

And I sprayed the light fixture in ORB spray paint to match:

But most of the appliances are stainless, so when I picked out the new faucet, I went with that finish, and I LOVE IT:

I wanted it to pop off the black sink, and it does beautifully.

As a side note, let’s check out the before shot I have of our sink from last fall, and the after one more time:


Look at the difference! Sigh. Happy face. Hearts. Eyes flutter.

Our family room has a dark brown finish on the ceiling fan, and I sprayed the vents with ORB spray paint to match:

I also spray painted the brass bars on the fireplaces in the family room and the bedroom:

I did not use high heat paint, and it has still held up great!

I have really been digging the look of brushed nickel lately. I think it looks so classic. I used it all OVER the Bub’s room redo:

propeller art

(Target propeller sprayed in brushed nickel.)

I used it on lamps, accessories, frames – and it looks FANTASTIC with the navy and white:

When it comes to light fixtures, I still prefer the darker tone of ORB – I think they make more of a statement hanging in all of that empty space. Most of our lights are the darker finish now:

 dining room

But we picked out brushed nickel light fixtures for our foyer and staircase when we built our house:

023

And I LOVE the actual fixtures, I just wish they were darker! The light in our foyer is much bigger than this one, and I would really love to just have them taken down, spray paint them, and then put them back up. But to that, we’d need scaffoldings and lotsa lotsa cash to pay someone brave enough to do it.  ;)

And if we’re going to pay that much, I’ll probably just replace them, and not mess with taking them down, painting, doing the hokey pokey and putting them back up.

Side note – anyone have a clue how to change a light bulb in these things? I guess we’ll be waiting till they all go out. :)

We still have brushed nickel lights in two of our bathrooms, including the master bath:

027

In our master, I’ve gone the ORB direction with the towel rods and light switch covers:

So I think the brushed nickel does look out of place. But so do the chrome faucets. :) But all of those will get replaced…someday. They are about 1,793 on the list. It’s a long one.  ;)

Our son’s bathroom has the same light, but I worked with it and went with the same finish for the toilet paper holder, towel ring, etc. So who knows if it will stay or go – for now I’m completely happy with it.

So you can see, we’re all over the place around here. :) My goal? I’d love to have (at least most) of the light fixtures and faucets in the oil rubbed bronze finish. I’d love to have little extras like vents, thresholds and railing brackets in the darker finish as well.

I am drawn to that dark, lovely metal tone – some say it will go out of style one day soon, but I think it’s a classic, traditional finish. (Remind me of that in ten years, umkay?)

If you are starting from scratch or want to get your finishes more cohesive – there are a few tips to follow:

  • Knobs on cabinets and dressers are the “jewelry” of your spaces, and you should have fun with them. Do whatever you love!
  • Light fixtures should be fairly consistent – but it also very much depends on the look and decor in the room too.
  • Our faucet finishes are mixed, and even when I’m done replacing them all, they’ll probably still be. :) That’s another one that depends on the space.
  • Ideally, door knobs and hinges should be consistent throughout the the house. But we’ve been living with a mix of ORB (lurve) and shiny brass (ick) for months, so do as I say, not as I do.  ;)

Most importantly -- keep in mind the style of your home and your decorating – as long as you are true to yourself and what you love, anything will work. :)

So how many finishes do you have in your house? Do you stay fairly consistent or are you in constant transition like me? What’s the metal for you? Nickel? Antique brass? Oil-rubbed lovely?  :)


Thanks to my new advertiser!:

aseaman

**I’ve got a great giveaway coming up this weekend! Stay tuned!


I’ve mentioned before that our bed is unmade about 99.99999 percent of the time. I just don’t do it. I don’t make beds. It’s kind of like the movie Groundhog’s Day to me – I mean, why go through all that just to have it messed up again in a few hours?

YES, I know it’s more than a few. Maybe more like twelve. Whatever.

But when I do make it, I find it to be really, really lovely. A made bed instantly makes the room feel put together, clean, serene. I feel calm when the bed is made.

So, because I washed our sheets the other day, I got a wild hair and figured I would make our bed. It was on a whim, so I did it later in the day. Which supports my theory on NOT making the bed even MORE…but I digress.

There is one big reason I rarely make our bed. And that reason is one MASSIVE mattress. It takes fooooorever…AGES to make it. Decades people.

I took pictures along the way to show you the agony that is making our bed. Prepare yourself.

Let’s look at the time, shall we?:010

Step 1: Discuss my plan of attack. With myself.:

004

(I cannot believe I am showing you our unmade bed.)

Holy cats. I’m already trembling in fear.

Step 2: Use all of my body weight to force the fitted sheet back over the mattress:

006

Step 3: Curse the day we thought it would be “so awesome” to get a mattress, with an extra mattress, with a pillow top, with a feather bed on top:

008

That’s 17 inches of softness baby. Did I mention NO SHEETS FIT? We do have one set, but it’s for the winter. So the rest of the year, I wrestle with the fitted sheet almost daily.

The fitted sheet usually wins:

009

That thing is tighter than me in my high school jeans. :)

Step 4:  Pull out the lint grabber and get all the cat hair and lint off the decorative pillows:

013

THREE cats people. Three.

Step 5:  Dig toys, sippy cups, remotes and Bear out of the sheets:

020

Yes, he’s maimed. We prefer the term “loved.”  :)

Step 6: Actually start making the bed. Break your back tucking in the sheets. Curse the day that you thought it was such a great idea to put the Target storage bins that you can’t sit or kneel on or they bend at the end of the bed:

022

Step 7:  Pull the twisted, smashed duvet cover out of it’s lodged spot because you were too lazy to put it back over the comforter when you washed it two weeks ago.

Step 8:  Wipe the sweat off your brow.

Step 9:  Iron said duvet. Yes. I said it. IRON IT:

024

Step 10:  Say a curse word. Under your breath. So the cats and the Bub don’t hear.

Step 11:  Lay the comforter out on the floor, and count the “squares” so you can figure out which freakin’ way is the long way:

026

Step 12:  Stuff comforter inside the newly ironed duvet cover. Sweat some more.

Step 13: Try not to cry. You CAN do this!

Step 14: Arrange comforter on bed just so, to camouflage the divots in the mattress that make it appear as though you and your husband are each 500 pounds:

027

Step 15:  Realize, yet again, that NOTHING fits a king-sized mattress that is SEVENTEEN inches thick. Try every way possible to get the bedding to cover all sides of the bed.

Step 16: Take the comforter OUT of the duvet, (the one you just put it in), lay it over the comforter to see if it hangs over the side more:

045

Step 17: Whimper.

Step 18: Pep talk time. Sarah YOU CAN MAKE THIS BED!

Step 19: Curse the day you bought a duvet cover with a huge rectangle on it, because it’s off center when you pull more of it over to the left side:

034

Step 20: Realize you just wasted a hour of your life. But you may have also lost a pound or two sweating, because your bed is ten feet off the ground and you have to run to each side every five seconds to adjust each side:

035

So there you go. Ridiculous, eh? Yes. It is. I realize this more every time I make it. But that’s only three times a year, so you see why it’s not high on the priorities:

043

But I have been a thinkin’ lately about a little update for our bedroom. New bedding, drapes, reworking the layout a bit…and I’m determined to replace the fan with a beautiful chandy.

I’ve secretly set the air to 55 degrees every night this summer so hubby won’t think we need it anymore.

KIDDING. (That is a good idea though. Hmmm.)

I’ve been browsing bedding online for the past few weeks, trying to decide if I’m going to go the HomeGoods affordable route, or the pricey Pottery Barn one. Hotel look like we have, or a bold print? Duvet, quilt or comforter?

I love these options from Crate and Barrel:

AbigailPslyBdgPimaIvryShtS9 GraceBdgClassicKhakiShtsF10

I adore this Barbara Barry set:

barbara_barry_bedding

But it would require repainting the room, and I do love our warm grey green color.

This set by Restoration Hardware is SO lovely!:

prod1608084_SP1-10

And pricey! :) But I bet it’s worth it.

I’ve had my eye on this set from West Elm for about three years:

img2l

It comes in so many lovely colors and it’s not insanely expensive. I just adore the big, fluffy tufts. I think it would look positively heavenly.

But would it cover both sides of the bed? THAT is the question!

So how about you – do you make your bed every day? Do you…really? ;) Is there a bedding set you love? Do you splurge? If so, is it worth it?

I’m determined to buy 1,000 count sheets before I die. And I will find fitted sheets that don’t pop off.

I will.

Thank you to my new advertiser!:

quick-dinners-button

P.S. It doesn’t always take quite an hour. Usually less. Sometimes I iron the duvet after it’s already on the bed, which saves a good 15 minutes. :)

P.P.S. Many have emailed me to find out where I got our bedding – it was an Ebay SCORE – only $25 for the set! But the seller is no longer on Ebay, and the tag on the bedding doesn’t have a brand name. I searched “hotel bedding” to find it.


078 (2)

Well heya! How was your weekend? I spent a few hours today completely wasting my time on a project – it’s one of those that just was a total FLOP. But as hubby always reminds me, at least I know now that it didn’t work, and I won’t always wonder. ;) Gah. (More on that later!)

When things don’t go right with my projects, I often take solace in a little luxury – taking a few minutes to browse my home decor catalogs. I LOVE catalogs.

I don’t subscribe to any home decor mags, don’t follow any “real” decorators and only know of luxurious fabrics like Kravet and Scalamandre because I worked in the decorating “biz” for a couple years. Now, I can’t remember the names of half of the fabric books I searched through every day. :) But that’s OK -- I am already sufficiently overwhelmed by all of your amazing projects I see out in blogland. (My head is swimming!)

Catalogs bring me a different kind of inspiration – very similar to model homes. I could spend a whole day walking through decorated models. LOVE.

I’ve told you before that most of the time when I’m taking pictures for this blog, the crap is chucked out of the shot, or cropped out. ;)  Sometimes I push everything out of the way, take the picture, and it’s not till later that I notice little things I didn’t get to:

It’s like a Where’s Waldo of sorts. But with me, it’s find the toy, or my latest favorite – the bag o’ chips:

I love me some sour cream and onion!! ;)

I personally think the stagers at Pottery Barn are some of the most brilliant I’ve ever seen. I open that catalog and ooh and ahh – every space just feels warm and lovely and gorgeous.

I keep saying I’m going to find a vignette I love, then try to copy it with what I have. But then I start studying a bit more and realize I don’t have a branch to casually perch on the mirror:

scan0003

How fantastic does that look? But in real life…hello?? A branch hanging off the mirror? Ummm, I wouldn’t even be able to look at myself! ;) (I kid, I kid!)

The more I break down the photos, the more I don’t quite get it.

If you look even closer, the paper menus scattered on the wall would look positively redonkulous in our house. And the one on the left, that looks like it fell off the wall? Do you know how many anonymous comments I’d get that would be all, “Um, your huge paper handwritten menu fell off the wall.”

And I’d be all, “Uh, DUH. It’s supposed to be like that!”

Yeah, not happening. But it looks OH so right in the catalog.

I think part of the reason I love the pages of the Pottery Barn catalog is that it looks like whoever lives there is ready to party at any second:

Fresh grapes for your guests? Check.

Fifty-two bottles of wine? Check.

Bread stuffed into glass? Check.

And why didn’t I think to have a olive oil tasting party?:

scan0002

Can I admit something here? For one hot split second, I thought -- “Wow. I must have an olive oil tasting party!”

NO, I must not. What the ?? I mean, I love olive oil. With some pepper and salt and some yummy dipping bread ---- yummmm…

But I am NOT going to have an olive oil tasting party.

Even though Pottery Barn makes me want to.

There is always something missing from catalog pictures…it’s the little imperfections. The personal touches. I adore this wall, but in our house, at least half the frames would be filled with faces:

scan0005

And the gourds on the bottom would be replaced with basketballs. That’s what our decorative baskets store.  ;)

But really…aren’t they dreamy? Really. I get lost in catalogs. They are such fantastic inspiration – for FREE.

Recently, I came across a fairly new site and I knew from the second I saw it I’d have to share it with you all. Many of you have probably already seen it, but if not, check out Catalog Living -- it is hiiiiilarious!

The author of this site has created fictional owners, Gary and Elaine, who live within the catalog pictures, and she pokes fun at the beautiful photos we drool over.

Just try not to laugh:

“Sure Gary’s out of town, but I’m perfectly capable of
starting a fire in the fireplace by myself, thank you very much.”


“If you go to Game Night at Gary and Elaine’s,
you can count on playing at least a few rounds of Wood Fish.”


“While Gary and Elaine were in the kitchen getting popcorn,
the brave yellow sweater attempted its escape.”


“Oh that?  That’s my Wish Plant. 
It’s where I clip pictures of people who I want dead.”


ACK!! I. love. it!! So freakin’ funny! The author is actually a actor/comedian named Molly Erdman:

(source)

Does she look familiar?

She’s the woman in the Sonic commercials:

(source)

Those made me laugh out loud. :)

Are you a catalog lova? Do you drool over the perfectly poised photos like me? As much as I love to look, I still don’t know if I could live in these rooms – but it won’t stop me from trying it out! (Just with Thomas the Trains scattered throughout and cat hair tumbleweed floating by.)

What are your favorite home decor catalogs? I drool over PB, Restoration Hardware and Ballard Designs. Any good ones I’m missing out on?


Hello peeps! I’m kicking off my “Show Me Off” series today with a blogger I know you’ll be spending a couple hours catching up on (if you haven’t already!) So just let the kids and the hubs know they’re on their own for dinner tonight. And maybe breakfast tomorrow. ;)

Emily at Decor Chick submitted a few projects that were a tuggin’ at my little decorating heart and I couldn’t wait to share them with you! And no, it wasn’t just because I liked her blog name so much!  :)

If you’ve been around these parts for one hot second, you know of my deep, abiding, bordering-on-obsession love of molding. Seriously. Sometimes I think I need a support group. By now I’ve brought so many of you on board, we’d have a nice little group going.

Emily and her Dad (LOVE when the Dads help!!) took this blank wall that was pitifully begging, “Please dear owner, please please put some molding on me?”:

And with a few boxes, added mucho character:

molding wall

Love that she filled in the wall with more photos too – it looks fab!

For more on this project, go here.

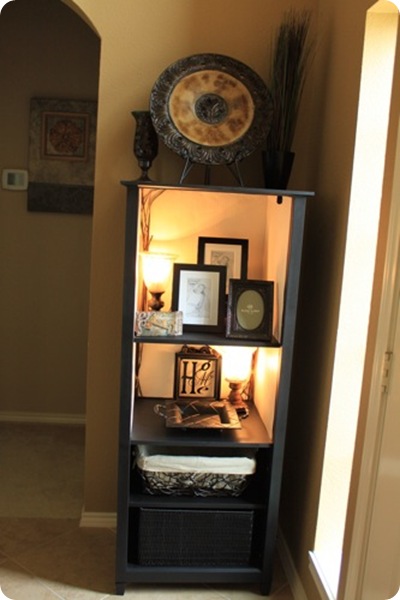
She found this little media cabinet at a thrift store:

Then took the doors off, added some beadboad wallpaper and some accessories, and how pretty is that?:

media cabinet redo

That little lamp inside totally makes it, don’t you think? It’s so warm and pretty!

For more on that one, go here.

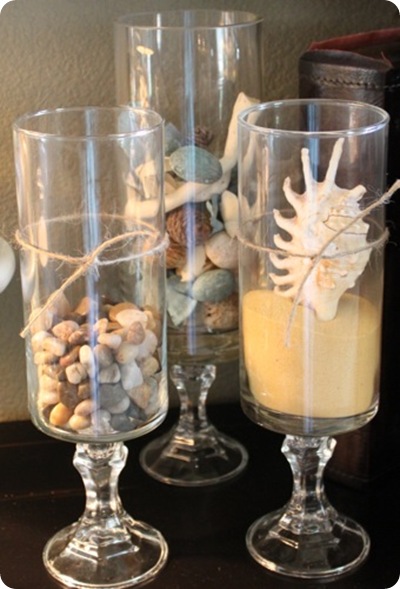
Emily saw a William’s Sonoma knock-off idea over at Get Your Martha On (I adore that blog name!) who got it from somewhere else, and so on. (The beauty of blogland!)

The inspiration was this fab hurricane:


So she made these, for TWO BUCKS EACH people!:

Williams Sonoma hurricanes

Umm…hello, that is awesome. I am envisioning these in my house filled with leaves and acorns for fa…… oops. Almost said it. Not gonna.

Anyway.

I’m totally making some! :)

For more on how to make the hurricanes, go here.

Emily attacks some painting projects I’m not sure I would attempt. Well, maybe I would, but there would be a whole lot of crying. And whimpering.

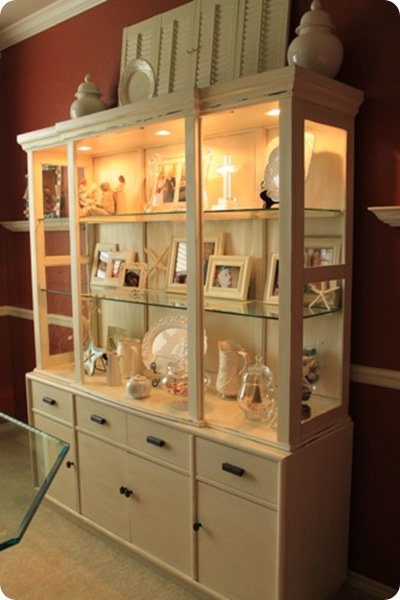
She took a dining hutch she had for years:

And painted it, beadboarded it, accessorized it and got this gorgeous result:

painted dining hutch

I love love love that she used frames and other decor in the hutch – thinking outside of the box my friends. It looks FAB!

For more on this project, go here.

Pretty awesome, eh? Thanks for kicking off this shindig Emily!

Would you like me to show off one (or more) of your projects? If so, send me all of the pictures/links/info I’ll need, and email them to me at thriftydecorchick (at) gmail (dot) com with the subject line “Show Me Off!”

I’ve had quite a response, so bear with me – it will take a while to get to all of you talented Squeezies!

Have a GREAT weekend!!


Popular Posts