Tampilkan postingan dengan label lighting. Tampilkan semua postingan
Hello there! Can you believe I'm writing to you at night? I haven't done this for years now! Ah, the memories! I was out of town in Chicago yesterday and most of today so I'm sharing this late. 

I'm continuing my dollar store candle DIYs with this beauty! You can see the snowy candles I shared earlier this week here. This is such a good one folks...I actually made these six years ago and I can't believe it's taken me this long to make them again! I think one of them broke a few years back and I never got to making a new match. 

I started over with two this time and they are so pretty! You'll need two things from the dollar store -- a glass candlestick and a glass cylinder candle holder: 
how to make your own glass pedestal candles

You can use any glue that will adhere glass. There's a few out there so just do what is easiest. This time I used this aquarium sealant I had from a past project: 
aquarium sealant to glue glass

Just few put a few little dabs along the top of the candlestick holder: 
how to make your own glass pedestal candles

And center the larger candle holder on top. Leave it alone to cure for the recommended time -- my sealant said 24 hours so even though it was sticking fine within 20 minutes, I left them alone for awhile. 

There are so many possibilities with these candle pedestals! I threw a few together to show you the different options for Christmas. I used cinnamon stick filler and nestled a glass votive inside with a tealight candle: 
DIY dollar store pedestal candle

I love the simple look of some glittery berries too: 
DIY pedestal candles using dollar store supplies

This is where I must say -- remember to never leave these unattended! If you want to use something like these berries I'd recommend a battery-operated candle -- I was using what I had to share these options with you.

I had some pretty glittery strands that I put in the bottom: 
how to make your own pedestal candles

This simple one with a few sprigs of greenery is a favorite of mine!: 

DIY dollar store pedestal candle with greenery

I love the fake snow in the bottom -- how pretty would that be with red candles? I wish I had red!: 
DIY dollar store candle with fake snow

I ended up using some gold sand I've had stored away -- it's so pretty!:
DIY dollar store candles with sand

I felt like the new stacked stone fireplace needed some candlelight and these are perfect!: 
stacked stone fireplace Christmas

These are super pretty with just the candle too! No need to add more -- but it's fun to dress them up for the holidays. 

At two bucks a pop you could make a ton for a beautiful centerpiece on a table or buffet! They really are so pretty: 
DIY stacked stone fireplace

This is one of my favorite dollar store DIYs! You can do so much with them! They'd be pretty and simple gifts too. Do you have any dollar store decor hacks you love?

Here's an image to pin if you are interested in saving this project for later or you can go here to repin:
DIY dollar store pedestal candles

Affiliate link included for your convenience! 


Hey there! I'm back today with some lighting updates around the house. I found a GREAT deal on a beautiful light a couple weeks ago while we were in Cincinnati. Our routine is usually to stop by IKEA, then head over to Kings Island for our son. This time I took a super quick trip into the Ballard Designs outlet store on the way to the amusement park. 

If you aren't familiar with this outlet, it's minutes away from IKEA in West Chester and it's a large store with Grandin Road and Frontgate as well. They usually have some fantastic deals but it had been years since I had been in. 

Luckily for our boy (who was totally over shopping at this point), I found a gorgeous light within two minutes of walking in. I get weird feelings about stores sometimes -- it's odd but it never fails me. I just knew I'd find a light I loved that day and so we went. I get that vibe about random stuff and it my intuition is almost always right. I wasn't even really looking for a new light, but something was drawing me to the store. I tell my husband it was meant to be when it happens. ;) 

The light was the Hadley pendant and it was big, but I knew had a number of places I could put it. I really want to change out our stairway light and our foyer light, and at first I thought I would put it in one of those spots. 

But we got home and I had a better idea…over the kitchen table. I knew it would look so good in there for a number of reasons, but was a little worried it would be too big. I measured the old light fixture (you can see it here) and turns out it was way wider than the new light and actually taller too. I was surprised because the new one seemed larger. I think because it's the same size uniformly, unlike a chandelier. 

Anyway, I got it up and was SO THRILLED:
Hadley light from Ballard Designs over table
Most of the lights in our home have stayed the same or maybe moved around here and there, but I don't change them out often. But the kitchen table light is one that I've probably changed out four times now over ten years. None of them have ever felt 100 percent right till now!

I absolutely LOVE IT: 
Rectangular light fixture over table

It works because it's so "light" feeling -- you can see through it completely so it doesn't feel like a heavy fixture. It's normally priced at $300, they had it on sale for about $230 and they had even more of a sale that day so I got it for $130. Score!! 

Our old chandelier had eight lights bulbs but it got so bright I changed most of the bulbs out to 40 or 25 watt -- so even with half the lights at 60 watts, this one lets off similar light at night. We still use our dimmer most times with it anyway: 
Hadley light fixture from Ballard Designs

So of course you change one and something else feels off, right? I hate when that happens. I had a couple lights from Joss and Main in my cart online for a week or so, and I knew they would work so much better with than our current lights in a couple nearby spots. 

This one in our family room was one I've wanted to change out for awhile. It just felt really heavy to me and that spot is supposed to be more of a flush mount light anyway: 
gray fireplace with built ins

I went ahead and got the Marceline flush mounts from Joss and Main and absolutely LOVED the lights, but they were such a pain in the butt to install. 

I have to preface my rant by saying I absolutely LOATHE installing light fixtures. Lighting is by far my least favorite DIY project -- there's always always always something annoying that happens when I install a light. All of the screws and junk have to be just right for everything to hang correctly and it drives me absolutely crazy. 

These had me cussing and sweating. I hated them with a burning passion. Flames…flames on the side of my face. (Name that movie!) If you purchase these know that they are beautiful and lovely but you need to purchase longer screws before you try to install them. Just a warning. But I loved them!: 
eat in kitchen and family room great room

I don't want that family room light to be such a focal point so I'm so happy with the look of this one, and it's higher too. 

Another annoyance with these is that the glass is permanently smudged. I have tried absolutely everything to get them clean…and they are clean. But the glass is damaged in a way that when the light is on they look dirty: 
Marceline flush mount

When the light is off you don't see it. I'm emailing Joss and Main to see if they'll send new glass because it's really not good. I'm still not over the anger from the installation yet so they are staying up. :) Too much drama to even consider taking them down right now, ha!

I replaced another light with one of these too -- five years ago I added a $5 light from the Habitat store to our small hallway by the stairs:
painting a thrifted light fixture

This was an area that could take a little more presence but I didn't want it to hang any lower than the old one. 

I just love it here!: 
Hadley Ballard Designs pendant light

I think the new kitchen light looks so great with these and I like that the two flush mounts match -- they add some consistency we were needing: 
Marceline flush mount joss and main

This one was also a pain in the butt to install and also has the weird glass problems, but I still like the lights a lot. These are a GREAT option for "boob" light replacements. They don't hang down too far and look great. Just be prepared to be annoyed when you install them. :) 

I got all three lights for the price of what the Ballard light is originally priced at -- not a bad deal at all! Have you been eyeing either of these light fixtures? The kitchen light is my new favorite and I throw heart eyes at it every time I walk in. I just love it. 

Tell me I'm not alone in the installing lights thing -- is it the worst job ever or what? I'd rather drywall and that's saying a lot. 


SaveSave
SaveSaveSaveSave

HEY there! What a fun weekend that was! I ended up getting a ton more done in the loft last night -- all of the cabinets are built up and installed and that was a BIG job. I also got everything put away in the cabinets and seat storage -- it is glorious! I have room to spare, whoot! Today I hope to work on baseboards and trimming out the window seat and maybe the window itself as well.

I'm totally digging that space and it's really starting to match the vision I had all these years! I have said it a million times, but I find when I really take my time and let the ideas develop in my head the spaces come out better than I could have hoped.

One of the rooms where that showed the most was our kitchen renovation that I completed last fall. I've been meaning to update you on some of the key pieces and since we've lived with it for about nine months now, I figured this would be a good time.

This renovation took me almost a year -- in the summer I'm usually a sloth so not much happened over those months, but overall it took a long time. We paid cash for everything and I did about 85 percent of the work in this room:
two toned kitchen renovation

My first project was extending the kitchen island and I'm still so thrilled with it. The larger surface area is FANTASTIC for baking and cooking and entertaining. If there is one thing I'd recommend doing, this would be it:
extending a kitchen island

I used our old island and built off of it. It now has wine storage and the end holds the microwave and more storage. We also can sit at least three at the island -- four if you pull a chair up to the end. The butcher block has held up well and I love the warm wood against the cabinets. It does show wear easier than other countertops, but I'm used to that and love it. You can't be a stickler if you want wood countertops. :)

Speaking of that microwave, I think that's the number one question I get -- how do we like having it lower?:
putting microwave in the island

I LOVE it. It took my husband longer to get used to it but now he doesn't mind it. A couple things to consider -- we don't use our microwave a ton. Maybe once a day, if that. Also, I'm tall and I still find it more convenient. I shut the door with my knee when I'm taking stuff out. :) The biggest thing is I think it's easier to get food in and out -- with really hot dishes maybe not so much, but as far as safety I think pulling them up and setting them down on a surface is easier and safer than pulling them down from up high. 

I was melting chocolate the other day and it was SO nice to be able just stand there at the end of the island and check on it over and over. And overall it's wonderful to not have it as the focus in the room. (Most new people to our home can't even find it, ha!!)

Another little adjustment I made early on (and I'm so glad I did) was to move the island away from the walls a little bit: 
Gray lower cabinets white uppers in kitchen

It just makes it feel more spacious in here and when we have people over it's easier to move around. I wouldn't move it too far -- we have our trash compactor in the island so I like that it's close enough I can just turn around from the sink to get to it. But moving it out has made the room feel bigger and easier to navigate. 

OH! The other question I get a lot is about that rug! It's from Target and I love the rug but DO NOT vacuum it. It will fall apart, I learned that fast. We still get random tufts that stick up occasionally and I just cut them off. I know you're not supposed to do that but there's no way around it -- and surprisingly it's held up well. 

We invested in two splurges in this kitchen -- the slide in oven was one: 
DIY vent hood over stove

I LOVE IT. It's so easy to operate, easy to clean and it cooks and bakes great. I love the look of it too -- not having a back to it makes the whole kitchen look more custom. I'm also happy that we went with a vent hood that vents outside -- I feel like it does help to get rid of smells quicker. 

The countertops were another splurge but I shopped around and actually found what I wanted for $1000 less than my first quotes, so do some checking. Honestly, I hesitated a bit to go with a hard surface. We had laminate that looked like granite for years and I really loved it. I was afraid I'd break a bunch of dishes knocking into granite but I haven't done that once. It was another addition that really amped up the whole feel of the kitchen. 

One thing I didn't consider is that the counters are about an inch thick, so our already deep sink (which is a MUST if you are redoing your kitchen) got even deeper. It wasn't undermounted before so it was an adjustment for me to get used to at first. It felt SO deep when I would wash dishes: 
River White granite countertops

Now I don't notice it, but it was a big adjustment at first. If you are really tall (I'm 5'9", my husband is 5'11"), then you may not want to go too deep with your sink. I wouldn't give mine up for one meeeellion dollars though. Also, having an undermounted sink is a gift from the heavens, no lie. Being able to wipe crumbs right into the sink without it getting stuck around the rim is fantastic! 

One thing to consider -- if you are making smaller updates like we did years ago with our sink and faucet, consider something that can be used down the line if you upgrade again. I specifically went with a sink that could be undermounted, even though we didn't do that until years later. 

I get asked about the backsplash a lot too -- I went unconventional with that and it's been awesome. It's so easy to clean and I feel at ease using it behind the stove top as well. It's hard to see the planking in photos, that's the only thing that bothers me. But in person it's obvious and gives the kitchen some farmhouse feel:

How to extend kitchen cabinets to the ceiling

The biggest undertaking in here was painting the kitchen cabinets -- I'm SO SO glad I decided to tackle that myself. I hesitated thinking it would be too much work and honestly, it takes time but it's not a ridiculous amount of work. The biggest hassle is waiting between coats so it takes a good week to two weeks to do it correctly. (Side note, this is their true color. They lean a little blue in some of my pics.)

A few weeks after the reno I shared an update on the cabinets and how some of them had not cured even that long after. I had anticipated that but was still surprised. I'm happy to report that they are now wipeable and scrubbable and there are zero imperfections beyond what I first saw. 

One thing to mention -- if you decide to paint your cabinets I recommend you put hardware on them. Especially at first until they fully cure (but don't put them on too soon -- I waited and then didn't tighten them for weeks). The less you will actually handle them the better, and using hardware will keep them looking beautiful for a long time. 

The final thing I'm SO happy we did was part of a bigger project years ago when we moved things around in the family room. Our old back door used to be in the middle of this bay window and things were so cramped over there: 
Window seat in bay window

That area was where our kitchen table used to sit and when we shifted everything over it allowed this area to be transformed. That window seat is one of my favorite spots in our entire house. I absolutely, positively adore it. AND it offers tons of storage. 

I have been keeping mental notes of what I've wanted to share with you all these months and I think I hit them all! If I missed something you're curious about please let me know. ALL of the sources for items and projects in this room are linked in this post. We didn't move any plumbing or cabinets and that helped with the budget a ton. I shared a breakdown of the whole renovation here

And because I can't resist, here are a few before photos to show you how different this kitchen looks now...


Hey there! How was your weekend? We worked hard outside and it's looking so beautiful! A few of you have asked about the backyard tour this summer and I'll have it up as soon as I can. We're so behind this year because we've been working on getting bigger projects done that only happen every few years (like deck and playset staining). We still have to have the house trim painted and then we will mulch, then I'll be sure to share it with you! We've been working so hard but there's so much to be done. Having outdoors spaces is WONDERFUL but a lot of work!

We've used the backyard more that ever this summer because it's turned out so beautiful. We absolutely love it. I shared our new outdoor dining room with you a couple weeks ago:
Outdoor lights under pergola

I LOVE having the table up under the pergola. We already use it so much more now and I love that we don't have to worry about soggy cushions to enjoy it. 

One of the smaller projects we got help with out here was one I've planned for a year now, since we added those pretty lights you see up there under the pergola. I shared more about those lights here and they are still holding up incredibly well, even through the winter. They are the best we've found and I highly recommend them. They are industrial quality -- I see the same ones at restaurants all the time. 

I bought three strands last year and planned to use the third one for this project. I really wanted to string another set out between the trees around our patio, but the river birch aren't strong enough for these heavy lights. Like I said, they're industrial quality so the cords are thick and would weigh down the trees and break them, especially in stormy weather. 

So we asked our guys who help us out with projects what they recommended and it was just what I had in mind -- using wires. When I see these strung over patios at restaurants they are usually hung on wires. I believe it's because they are so heavy -- just stringing them alone would pull on the cord too much and they would sag quite a bit. 

They ended up getting wire from the hardware store and large eye hooks like this one: 
Tips to string outdoor lights

They used some kind of bracket to close down on the wire to keep it taught. These
look like an even better option:

These come with the eye hook and I believe you tighten the wire by twisting. 

One end went into the pergola and then they strung it way out to our bigger trees in the back. It was quite a span -- I'd say a good 15-20 yards of wire at the longest section? We have more mature trees back there and they won't bend with the tension. They took another wire over to some bigger trees on the side of the yard as well. 

Then they were able to hang the lights buy using zip ties -- as long as you get them tight the the lights won't move anywhere. Here's a closer look at a corner: 
Using wire to string outdoor lights

See the wire going over through the trees? 

And here's a wider shot of the wires and lights:
How to string outdoor lights

I actually wanted a more "droopy" look then what we ended up with, and was almost going to take a few of them off the wire to give that look, but decided against it. I think the more support the better, and the straight look has grown on me. I think it looks clean and keeps them out of the way. 

If they couldn't get the wire out to the bigger trees I was going to have them place some poles in the ground, but that would have been a lot more work. (You'd have to dig and use cement -- but it's an option if you don't have strong trees.)

Sometimes you can see the wires a lot and sometimes barely at all. They don't bother me though because they made it possible to have a truly dreamy space underneath. The first night we sat under the lights and giggled like little kids because it was just SO pretty. It's just silly how gorgeous it is lit up. 

I was going to take a photo from under the lights for you but we had storms last night. I may update this if I can grab one tonight. For now this is the finished result from further back:
How to string lights over patio

We have quite a grade to our yard so getting high enough in the trees was going to be difficult -- that's why we hired this one out. If you have a flat backyard and something to attach the wires to it would be a pretty easy DIY project. 

Just when I think it can't get any better out here, it does! :) They add so much ambiance out here, we just love the look. 

P.S. Here's a look at night! :)


Affiliate links included for your convenience!

Hello my friends! I hope your weekend was great. I have lighting on the mind lately -- I picked the wrong lights for the wall in the loft/craft room redo that I'm working on and need to find something else that works better. I don't often misstep with that kind of thing but the ones I got are crazy big!

I need to reevaluate and I think I know the direction I'm heading. I have a trend in my own home and it comes from my love of sconces. I adore them. But the kind I like, with beautifully arching "necks" or swing arms that are adjustable ALL seem to be ridiculously expensive. Like, $200 and up a pop. For one I may spurge…maybe two. But usually you use more than one:
lights above windows in kitchen

Goodness, that kitchen is dreamy. I want black window mullions in a bad way. 

Anyway, I just love the look. They look great in kitchens, in hallways, over windows and doors, in stairways, workspaces…everywhere:
swing arm lights in kitchen

I learned years ago that the price was more than I was willing to pay, so I started thinking outside the box. The answer? Outdoor lights! I've done it again and again and they give me the look I want for a fraction of the price. 

I used this galvanized light from Lowe's in a couple spots in our home:

galvanized dark sky outdoor light
It's $30 and super cute. I used a couple in our mud room
DIY mud room bench

I love that galvanized look! 

And also over the window seat in the kitchen: 
window seat in kitchen

Most of the outdoor lights I find that I like are rated and described as "dark sky" which means they cast the light down below (this helps lessen light pollution outside). For inside this means ambient lighting that is perfect for cozy spots or areas you need task lighting. 

I found a dark bronze version of this one here

bronze outdoor sconce

I think the first time I ever used an outdoor sconce inside was in my son's book nook I created years ago: 
DIY book nook in closet

I still think it's the cutest little light ever and I found it for only $12 at Menards! Seriously, the outdoor lighting prices are a steal compared to indoor sconces. 

I can't find that one anymore but I LOVE this one too. It has the cage look on the bottom, which is very industrial and farmhouse-y:
bronze light with cage
I knew I wanted to add the same look on a large wall in our kitchen, but didn't want to spend a ton. I found the perfect solution with these dark sky lights


gooseneck bronze lights for kitchen


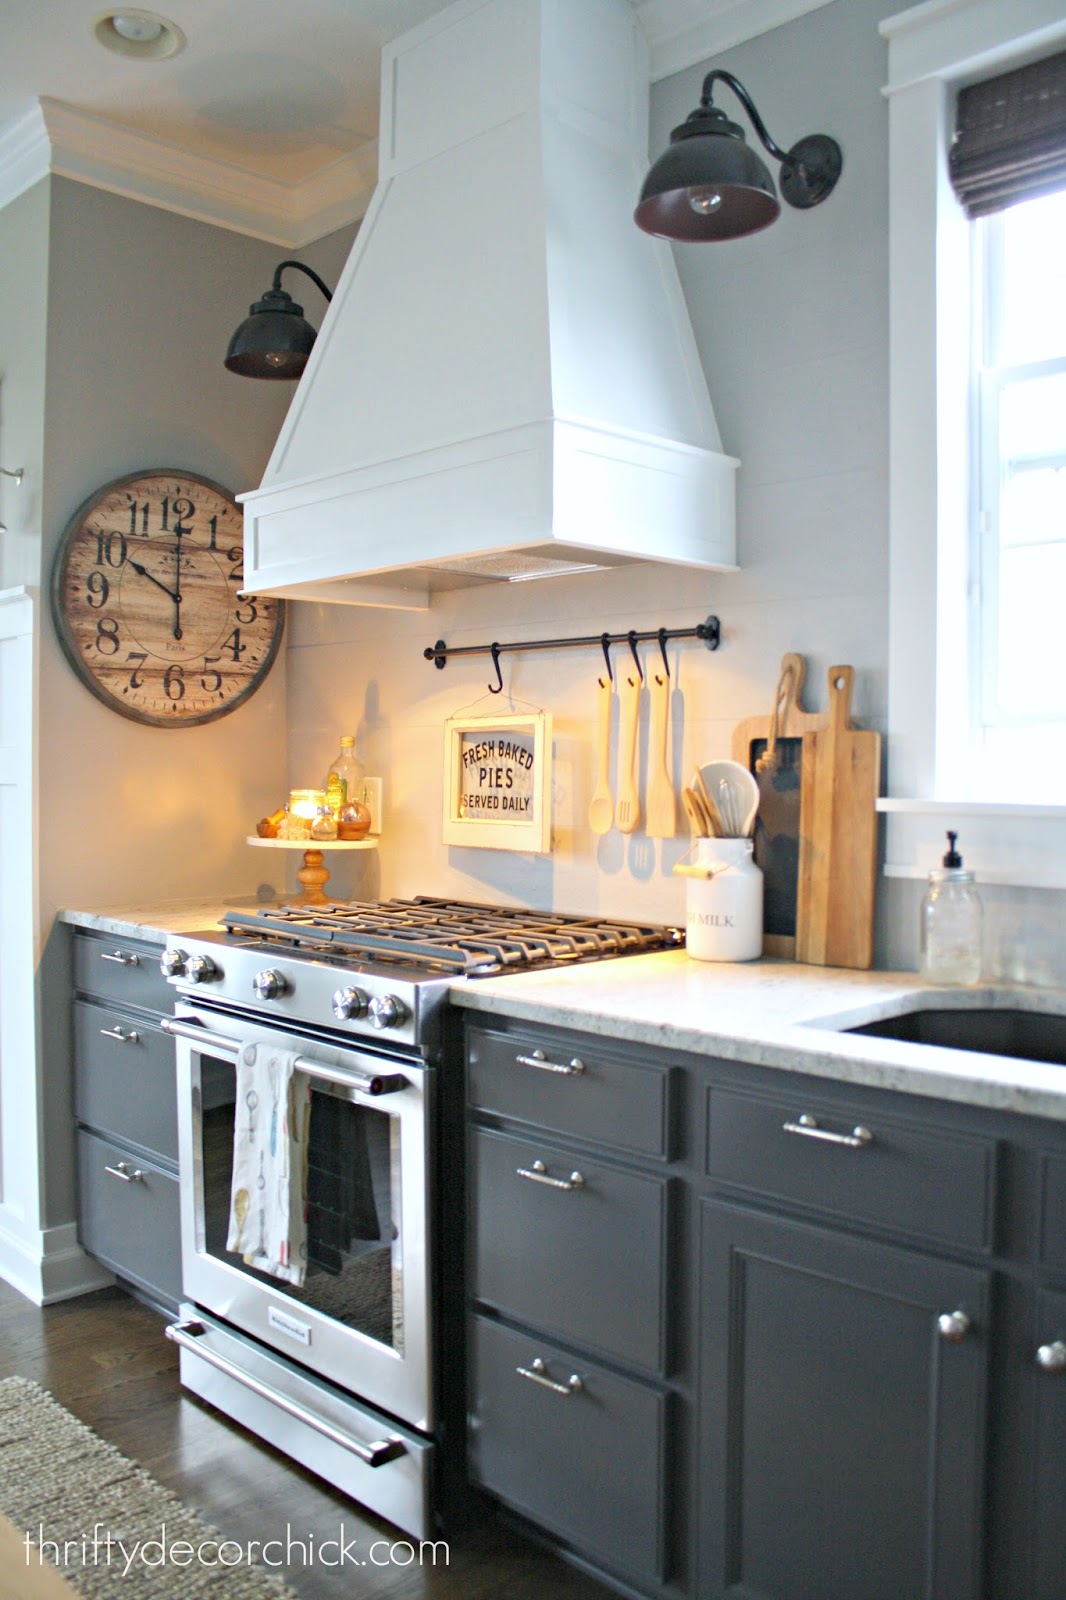
I ended up spraying mine black and I LOVE them in our new kitchen
DIY stove hood with lights

I put the vintage bulbs inside for a soft glow (and they are dimmable). They are one of my favorite parts of our kitchen! 

I looked for MONTHS to find exactly what I wanted over the DIY bookcases my Dad and I built for our dining-room-turned-library. I mean, it was driving me crazy. Of course when I looked at the outdoor section at Home Depot I found something that worked perfectly: 

bronze outdoor lights for inside
I wanted these to tilt and shine onto the bookshelves, so I bent them ever so slightly and it worked! They are lovely and I adore the added light in here:
How to build bookcases with accent lights

I needed four and at only $30 each these were a fantastic find. Unfortunately I can't find these exact versions at Home Depot anymore but you can still find them on Amazon here. I love how the bronze glows underneath when they are lit up:
DIY bookcases with accent lighting

There you go -- a much more affordable option if you love this look as much as I do! These sconces are one way I love to add character to our home -- they make it feel so cozy and older than it really is. It's a timeless look that I just love. 

So if you're on the look for that perfect sconce, check the outdoor lighting! I bet you'll find something you love! I'll be back soon with an update on what I pick out for the loft project. :) 

I'll be back this Friday as I'm taking a few days away from the computer to hang with my family this week. See you back here then! :) 

Some affiliate links included for your convenience. 


Popular Posts