Hello all! Hope you had a lovely weekend! I had a great time out on Saturday with some friends and also got plenty of family time in too. It was a great one.
This week the posts will probably be up later like this one – it’s so cold here and will be all week so we’re expecting school delays most of this week. That means my kiddo doesn’t get off to school till almost 11 so it pushes my day back quite a bit.
Have I mentioned it’s cold? Yeah. I’m still doing OK with it – in another two weeks I’ll be about done.
So I’m thinking more about the master bedroom redo lately. I’ve made changes over the past six months or so – I started painting (and stopped, but now I know my direction and I’m going to start again), made a new headboard and made a couple other changes along the way.
I sold our old bed so I have $500 to spend on the redo and so far I’ve spent about $350 (including items from today’s post) to start the transformation. That includes bedding, the headboard, all new window treatments and some of the paint.
The only part of the redo that won’t be covered by that $500 are the new floors…which we decided we will go ahead with next month.
Lately my focus has been on the windows. Up till about Christmas they've been nekked (I took the old drapes down months ago) with only some wonky roman shades up:

The roman shades are about seven years old, maybe older. These are the shades I spray painted years ago. (Yes, spray painted.) The new color held up great – the shades themselves didn’t. You can see in that pic that the left one wouldn’t go higher than half way.
I got tired of the room being so dark during the day so I finally got some new ones over the holidays and hung them a few weeks back. This time I went higher above the window and did the outside mount instead of inside the actual window frame:

In this pic they are pulled all the way up to top of the window – LOVE it. It lets so much more light in the room and also makes the windows feel bigger. (More on that in a bit.)
That was a big change but I knew I wanted something else to soften them up. I’ve had my eye out for drapery fabric for months but wasn’t finding anything that worked that worked with the busy bedding. I wanted something really simple and it wasn’t till I was in IKEA a couple weeks ago that I realized a solid color would be perfect:

They are the Sanela curtains – they look like velvet and I got the dark gray. Because the roman shades are hung higher I needed to clear those so I went with the 118 inch drapes. ($70 for two panels.)
Turns out I had to cut about 17 inches off the bottom and hem them to make them work so I was thisclose to being able to get the cheaper (shorter) ones, but I’m glad I went with with these in the end.
Anyway. I had picked up a long drapery rod at HomeGoods a couple months back so I got that up yesterday. Hanging drapery rods is one of my least favorite jobs, really. It’s easy, just tedious. The hardest part is making sure you place the hardware in the exact same spot on both sides of the window. Once you get your measurements figured out, mark where you need to drill, then use a stud finder to see if you need to use anchors or not:


You know Mama went out when the nails are painted. :)
The stud finders are sometimes wrong, so I always use a drill bit to make my holes first. If I hit wood I know I don’t need an anchor there. The finder said there was no wood in this spot, but when I drilled the top one hit wood:

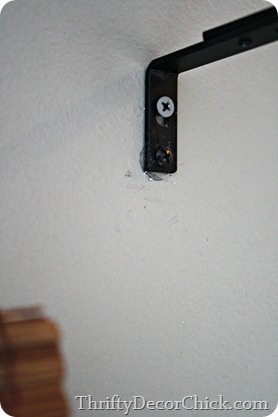
Now that I show you in photos it seems like the easiest project ever, gah. Like I said, it’s not hard…just time consuming to get all the parts level and secure in the wall.
So these drapes have grommets and I LOVE them. I’ve never used grommeted drapes before and the fact that they hang so nicely and you don’t need rings/hooks is awesome.
Our window is so close to one wall (shakes fists in air at home builders) that I don’t even put the decorative finial on that side:

You can’t even tell when it’s up. Also, if you’re going to use your drapes (we are in here) then I always recommend placing one drapery ring (or in this case one grommet) on the end, on the other side of the hanging hardware. Does that make sense? This keeps that end of the drapes from moving when you pull them shut.
I love the pretty glass finials on this rod:

I used to go big and chunky with our window rods and finials but over the past few years I’ve moved to lighter and thinner.
I waited to take pics this morning which was DUMB. This room is impossible to photograph, especially in the morning, but this gives you an idea of how it came together:

YES, the walls are still two different colors and YES I still haven’t finished painting the wall to the left, but I’m sure of what I’m doing now so I’m moving forward…finally. :)
Let’s just pretend the walls are all painted, OK?
I got them up and REALLY loved how they looked. They are sophisticated and a little sexy and I love them. When the walls are all the light gray they will stand out even more. I get a lot of questions about how well the bamboo shades filter light -- these are the shades I always get from Home Depot and they have a tighter weave then most:

Keep in mind all that sun across the floor is from the reflection in the mirror.
In general I think they are fine without liners (I’ve found bamboo shade liners at Lowe’s), although there is one point in the morning when the sun moves across a sliver in the shade and is like a laser beam into my face, which I’m so not cool with. I wanted to make sure the drapes would be thick enough to block it out and our room was so dark this morning, it was awesome.
Here’s the same shot, same time of day with the drapes closed:

All that light is coming from the other side of the house. The room stayed nice and dark.
So quickly, here’s my thought on hanging window treatments high above a window. I think most of the time it really can make a huge difference – it can make a smallish window look and feel much bigger. Hanging my bamboo shades higher really does let a lot more light in too. BUT – I think sometimes doing this can look really awkward too. I recommend hanging your blinds/shades higher if you plan to hang your drapes higher too. Otherwise the illusion is ruined, if that makes any sense. You can see the true height of the window if the shades are hung using the inside mount and if you hang the drapes a foot higher it still makes the window seem small, you know what I mean? I think when both are hung higher than the window it comes together nicely.
You know, the real issues in life…where to hang your drapes. :)
I decided a while back that I wanted our bedroom to be more sophisticated then it’s been in the past, but also soothing. I’m usually not one to use similar tones throughout a room like this, but I’m loving how it’s coming together.
Once this wall is painted and the floors are redone I think it’s going to be really pretty, I’m really excited about it:

And YES I still have a magazine problem.
Other than painting I have a wall treatment idea in mind, I’m planning on a redo for that floor length mirror and I hope to recover the bench at the end of our bed. Lots to do but I’m happy with how it’s coming together.
Do you love roman shades or are you a blinds girl? Do you hang your drapes high or like them low?


 10.11